
I’m one of those people who will buy a rub or marinade and then add a whole load of other ingredients to it because I have very little faith in it actually delivering the taste I want! This was exactly what happened when I purchased an instant rub intended for chicken, fish and meat from my local halal butchers. The rub was intended to be used dry straight onto chicken/fish/meat but you know me, I didn’t do that and instead created my very own recipe which I have cooked several times and has become a firm favourite in my house. A while back I got together with both my sisters and their kids and cooked this for them, they all loved it so much too!
Since the rub was a spicy one I decided to balance it out by using some sweet ingredients which would counteract the spiciness, primarily because whatever I cook I have to ensure the whole family can eat, including my young daughter. The recipe is fairly mild, there is a heat that comes from the chilli after taking a bite but it isn’t spicy in the true sense, if you have very young children they may find it slightly spicy on their palates so adjust if you feel this isn’t suitable. Initially when I cooked this recipe I used golden syrup and honey in the marinade to create a sticky mixture to coat the chickens in, however I appreciate not everyone has golden syrup in the house so have simplified the recipe by using honey which has pretty much the same taste but I actually think the golden syrup adheres to the chickens better and gave the chickens a beautiful glaze and glossy finish, so add it if you have it to hand.
Because I purchased the rub in the UK I didn’t want my overseas followers to miss out on this great recipe so I made my own rub and tested to ensure we got the same results. The spicy chilli garlic rub is really simple to make with a few basic ingredients. Prepping this recipe is very simple, the only hard work is actually washing and preparing the chicken(s). I used two tandoori sized chickens for this recipe because we like drumsticks and thighs and by using two smaller chickens means we can enjoy more of those pieces (they are called this because they’re fairly small, nothing to do with tandoori spices), you can alternatively use one larger roaster chicken for this recipe. I’ve used vegetables we enjoy eating at home, if you don’t like carrots, red peppers or red onions replace them with ones of your choice…..you can work out what suits you, just don’t ask me, lol!
This is an easy recipe which not many can go wrong with, once prepped bung it into the oven and watch a movie or read a good book, it really is that simple! I hope my Spicy Chilli Garlic Chicken brings some spice and warmth to your dining table.
Serves 6
You will need for Spicy Chilli Garlic Chicken
For the spicy chilli garlic rub:
1 tsp garlic powder/granules
1 tsp salt
1/2 tsp chilli powder (use more if you want a spicier meal)
1/2 tsp sugar
For the marinade:
2.5 tsp spicy chilli garlic rub
3 tbsp oil
2 tbsp honey/maple syrup
1 tbsp golden syrup (optional but definitely tastes better if you add this)
1 – 2 tsp water (to emulsify ingredients)
For the main recipe:
2 whole tandoori chickens (these are called tandoori chickens because of their size, slightly smaller than a roaster chicken but you can use 1 large Roaster chicken if you prefer)
2 red bell peppers
2 red onions
3 carrots
6 – 7 cloves of garlic
4 sprigs of rosemary
4 sprigs of thyme
ground black pepper (to taste)
rock salt (to season vegetables)
For the gravy:
2 tbsp cornflour (more if you want a thicker sauce)
a little cold water
salt (if required to your taste)
Method:
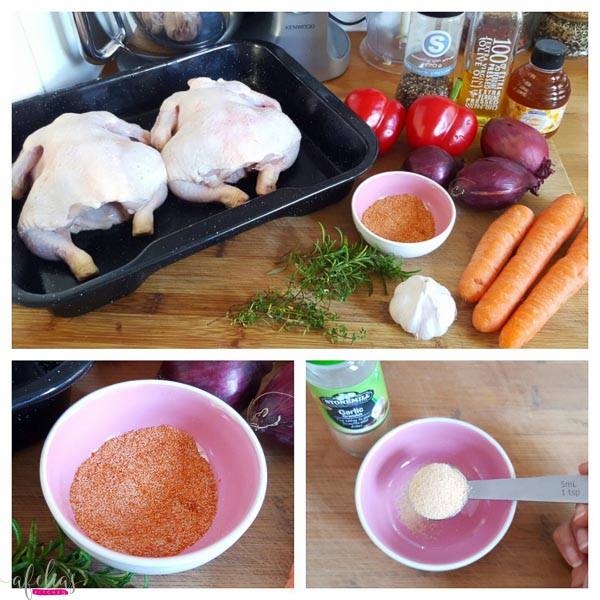
Before prepping the chicken/vegetables start by making the spicy chilli garlic rub.
To a small bowl add 1 tsp garlic powder/granules….
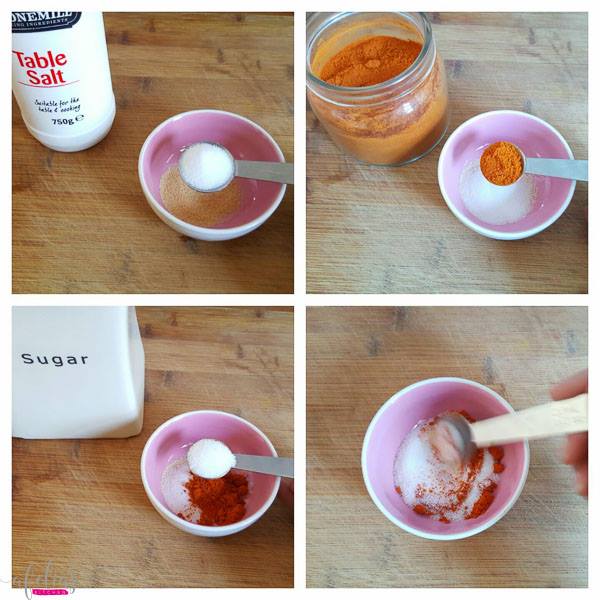
….followed by 1 tsp salt, 1/2 tsp chilli powder and 1/2 tsp sugar. Mix and leave to one side.
The spicy chilli garlic rub is ready to turn into a marinade once we have finished preparing our chicken(s) and other ingredients.
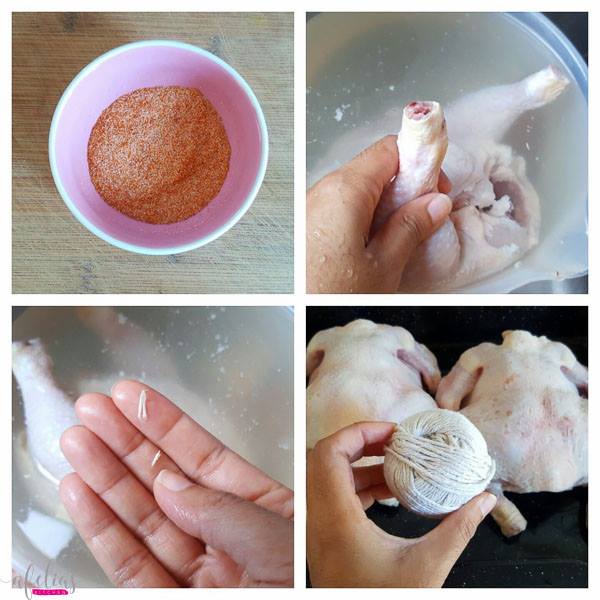
Next wash the chickens and remove any feathers or fine hairs that may have been missed, clean the cavity of the chicken too. ALLOW TO DRAIN WELL before using string to tie the legs together, this will help the chicken(s) retain their shape whilst cooking.
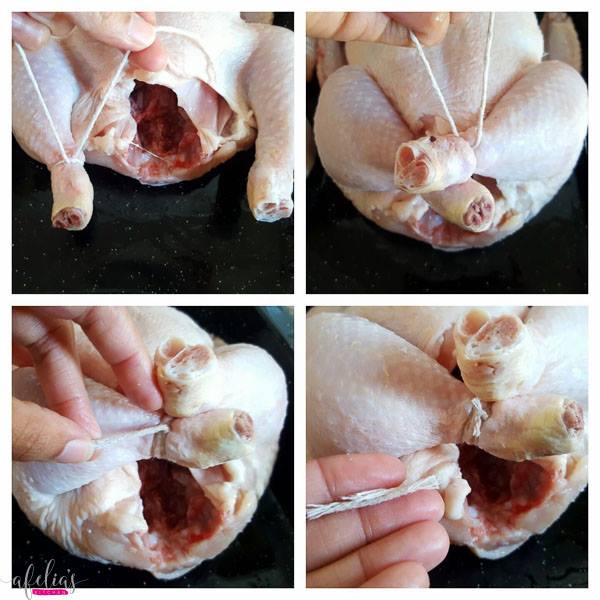
Cut a length of string and tie around the left leg (top left photo), bring the right leg over and tie tightly above the left leg.
Take the string around both legs once more and secure with another knot (bottom left photo), cut off any excess string.
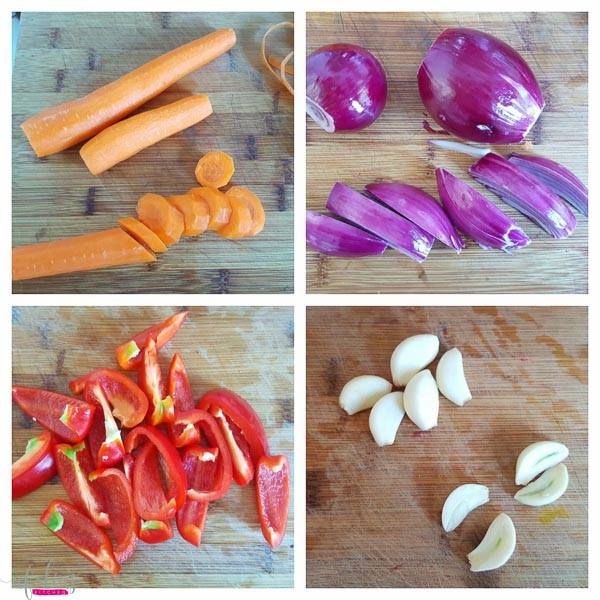
Peel and slice 3 carrots (diagonally as shown), 2 red onions (keep them fairly chunky), 2 red peppers and cut in half 7 cloves of garlic.
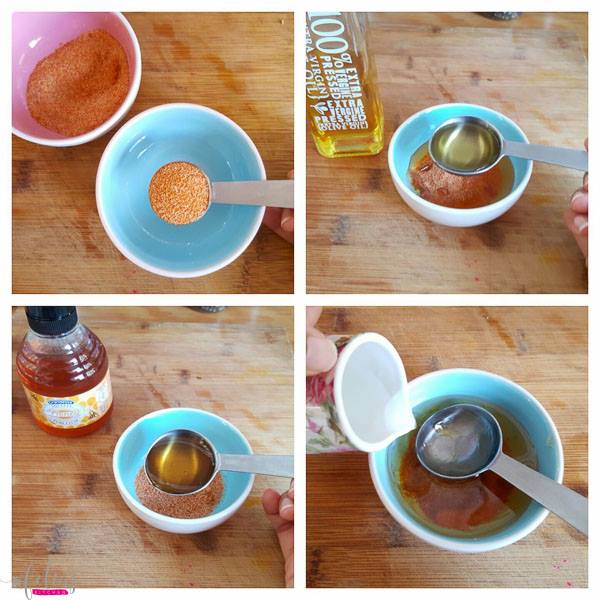
Using the spicy chilli garlic rub made earlier, now begin to make the marinade for the chickens.
To a small bowl measure and add 2.5 tsp of the rub (leave aside any excess rub for later), 3 tbsp oil, 2 tbsp honey, (also add 1 tbsp of golden syrup if you want a beautiful glaze to your chicken(s), this step is NOT pictured). Lastly use 1 – 2 tsp of water to emulsify the ingredients….
….mix well until the ingredients are well combined.
Preheat your oven to gas mark 5/6 now.
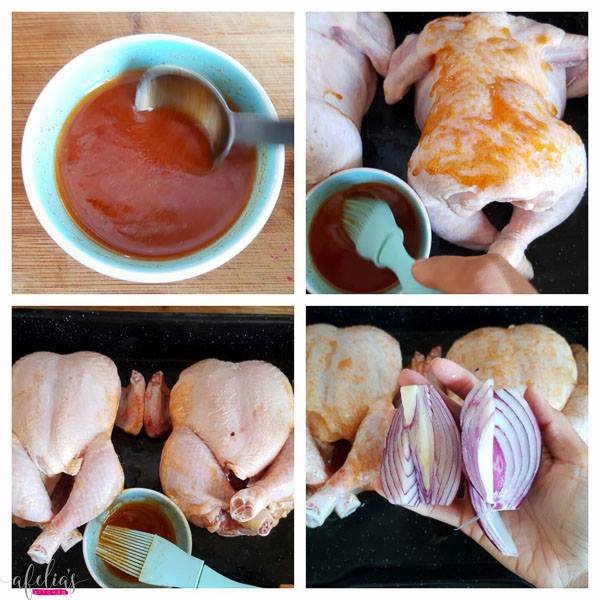
Ensure your chickens are COMPLETELY DRY before applying the marinade, use a kitchen towel to remove any excess moisture if they are still wet. Place the chickens in a deep baking tray and use a brush to apply the marinade to the BOTTOM of the chicken(s) first, then turn over the right way up and brush the top side.
Next scatter the chopped vegetables around the chickens in the baking tray, starting with the red onions….
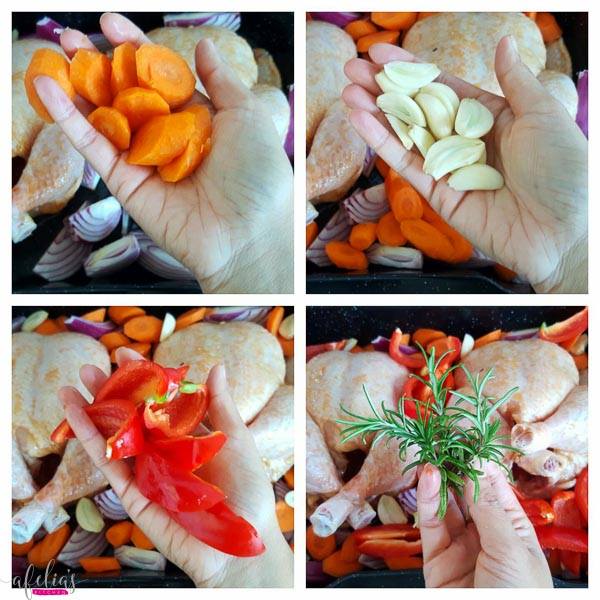
….carrots, halved garlic cloves, sliced peppers, 4 sprigs of rosemary….
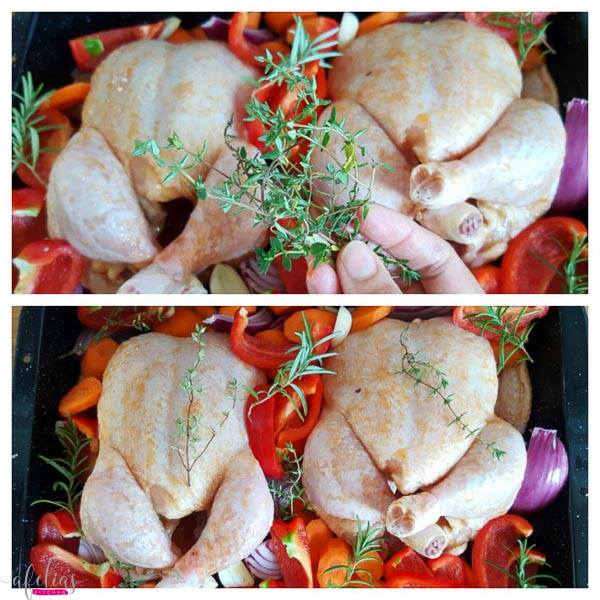
….and 4 sprigs of thyme.
Take a moment to appreciate the beautiful colours of the dish!
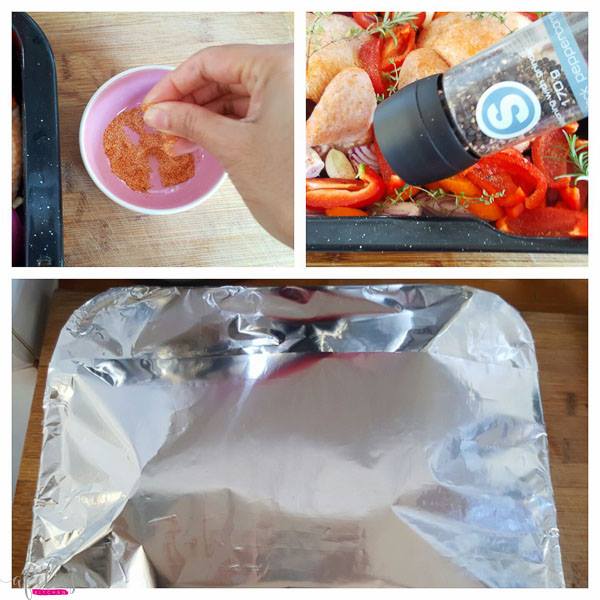
Take any leftover excess rub and sprinkle over the vegetables, along with a generous sprinkling of black pepper.
Cover the top of the tray with foil and cook covered on gas mark 5 – 6 for 1 hour and another 20 – 30 minutes uncovered. Cooking times will vary depending on how powerful your oven is so do check the progress as you go, larger chickens may need more time to cook fully to the centre.
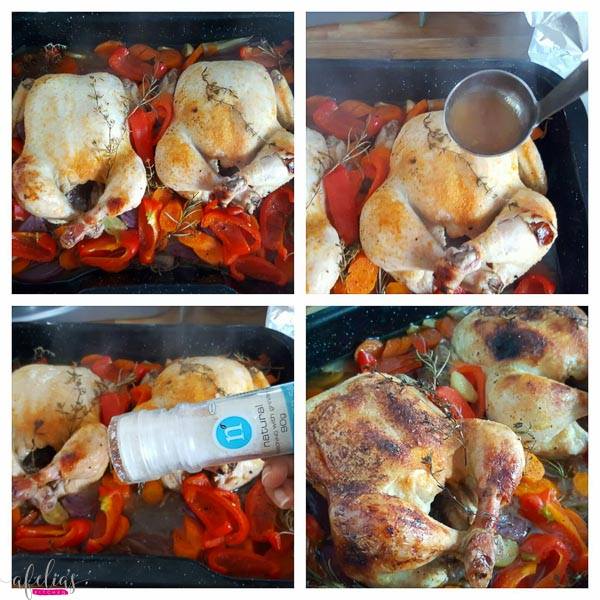
After 40 – 50 minutes check the chicken(s) and ensure the tops aren’t browning too quickly. Baste the chicken(s) with some of the juices in the tray (top right photo), continue to bake covered till about 1 hour has elapsed.
I tasted the juices in the tray at this point and felt it was lacking salt so added some rock salt over the vegetables, add to suit your taste if you feel you need it.
After 1 hour remove the foil and carry on roasting the chicken(s) in the oven for another 20 – 30 mins to crisp up the skin till it looks like the top right photo. Ensure the chicken(s) has/have cooked all the way through by piercing the skin and checking that the juices run CLEAR, if there is blood in the juices return to the oven and cook covered with foil (to speed up the process).
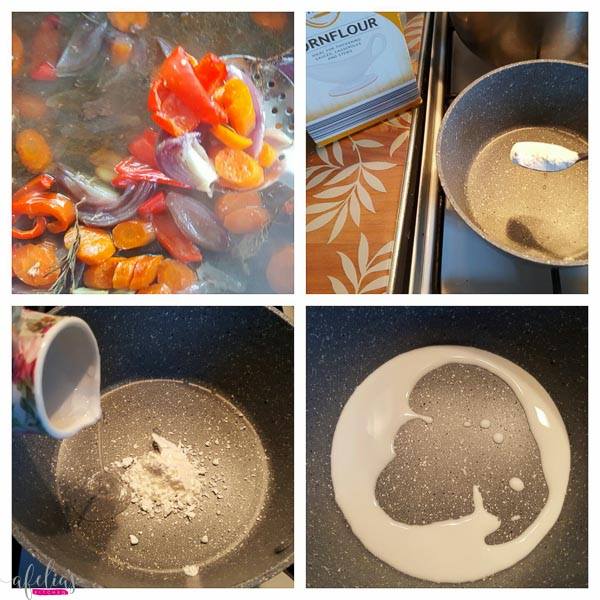
To make a gravy from the juices in the tray start by straining the vegetables using a slotted spoon and reserve in a separate dish.
To a cold saucepan add 2 tbsp of cornflour and dissolve using a little cold water – it is IMPORTANT to dissolve the cornflour using cold water otherwise you will end up with a lumpy gravy.
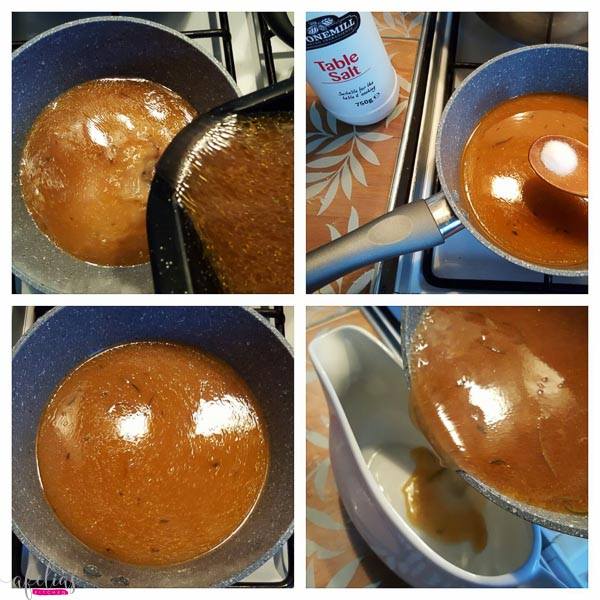
Pour in the juices from the baking tray into the saucepan and turn on the heat/gas. Heat the gravy till it is reduced and thicker, you may want to add salt to your taste at this point.
Once thickened to the consistency you like, pour into a gravy boat and keep warm for serving.
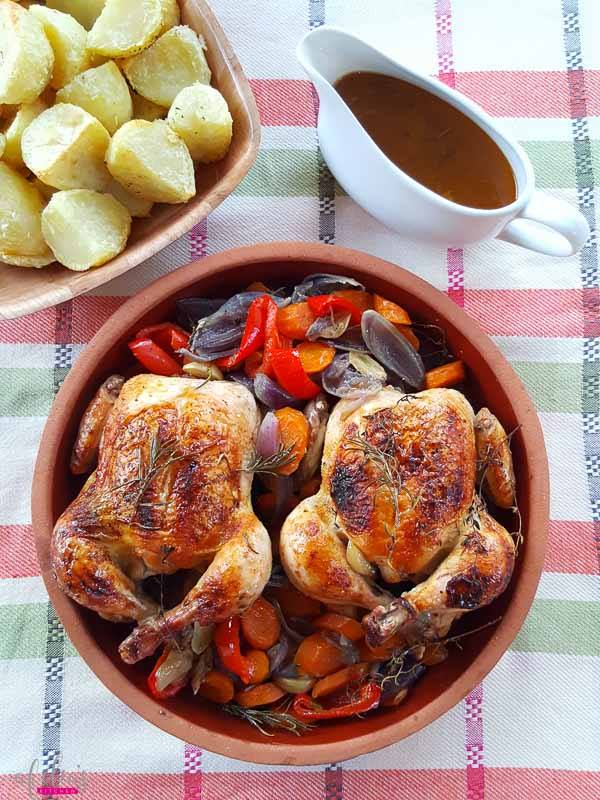
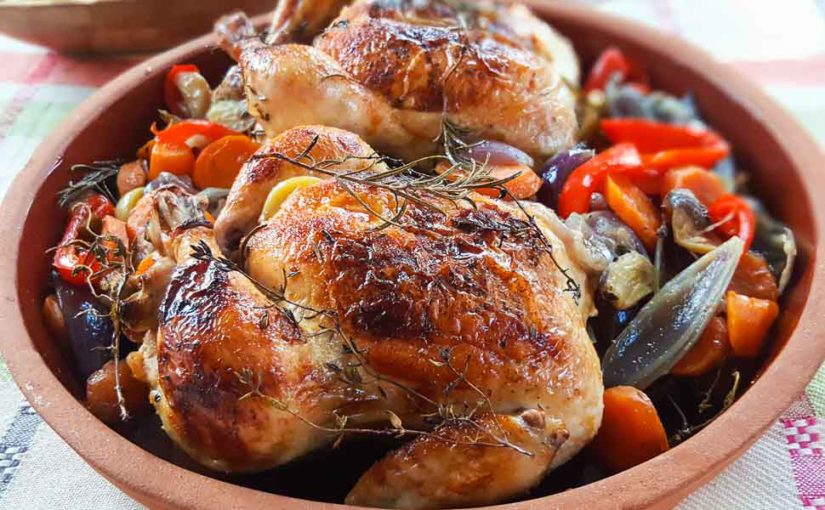
Place the strained vegetables in a large dish and add the cooked chicken(s) on top. Serve the Spicy Chilli Garlic Chickens with roasted potatoes or a creamy buttery mash and savour the flavour!
Bon Appetit!
- 1 tsp garlic powder/granules
- 1 tsp salt
- ½ tsp chilli powder (use more if you want a spicier meal)
- ½ tsp sugar
- 2.5 tsp spicy chilli garlic rub
- 3 tbsp oil
- 2 tbsp honey/maple syrup
- 1 tbsp golden syrup (optional but definitely tastes better if you add this)
- 1 - 2 tsp water (to emulsify ingredients)
- 2 whole tandoori chickens (these are called tandoori chickens because of their size, slightly smaller than a roaster chicken but you can use 1 large Roaster chicken if you prefer)
- 2 red bell peppers
- 2 red onions
- 3 carrots
- 6 - 7 cloves of garlic
- 4 sprigs of rosemary
- 4 sprigs of thyme
- ground black pepper (to taste)
- rock salt (to season vegetables)
- 2 tbsp cornflour (more if you want a thicker sauce)
- a little cold water
- salt (if required to your taste)
- Before prepping the chicken/vegetables start by making the spicy chilli garlic rub.
- To a small bowl add 1 tsp garlic powder/granules....
- followed by 1 tsp salt, ½ tsp chilli powder and ½ tsp sugar. Mix and leave to one side.
- The spicy chilli garlic rub is ready to turn into a marinade once we have finished preparing our chicken(s) and other ingredients.
- Next wash the chickens and remove any feathers or fine hairs that may have been missed, clean the cavity of the chicken too. ALLOW TO DRAIN WELL before using string to tie the legs together, this will help the chicken(s) retain their shape whilst cooking.
- Cut a length of string and tie around the left leg (top left photo), bring the right leg over and tie tightly above the left leg.
- Take the string around both legs once more and secure with another knot (bottom left photo), cut off any excess string.
- Peel and slice 3 carrots (diagonally as shown), 2 red onions (keep them fairly chunky), 2 red peppers and cut in half 7 cloves of garlic.
- Using the spicy chilli garlic rub made earlier, now begin to make the marinade for the chickens.
- To a small bowl measure and add 2.5 tsp of the rub (leave aside any excess rub for later), 3 tbsp oil, 2 tbsp honey, (also add 1 tbsp of golden syrup if you want a beautiful glaze to your chicken(s), this step is NOT pictured). Lastly use 1 - 2 tsp of water to emulsify the ingredients....
- mix well until the ingredients are well combined.
- Preheat your oven to gas mark ⅚ now.
- Ensure your chickens are COMPLETELY DRY before applying the marinade, use a kitchen towel to remove any excess moisture if they are still wet. Place the chickens in a deep baking tray and use a brush to apply the marinade to the BOTTOM of the chicken(s) first, then turn over the right way up and brush the top side.
- Next scatter the chopped vegetables around the chickens in the baking tray, starting with the red onions....
- carrots, halved garlic cloves, sliced peppers, 4 sprigs of rosemary....
- and 4 sprigs of thyme.
- Take a moment to appreciate the beautiful colours of the dish!
- Take any leftover excess rub and sprinkle over the vegetables, along with a generous sprinkling of black pepper.
- Cover the top of the tray with foil and cook covered on gas mark 5 - 6 for 1 hour and another 20 - 30 minutes uncovered. Cooking times will vary depending on how powerful your oven is so do check the progress as you go, larger chickens may need more time to cook fully to the centre.
- After 40 - 50 minutes check the chicken(s) and ensure the tops aren't browning too quickly. Baste the chicken(s) with some of the juices in the tray (top right photo), continue to bake covered till about 1 hour has elapsed.
- I tasted the juices in the tray at this point and felt it was lacking salt so added some rock salt over the vegetables, add to suit your taste if you feel you need it.
- After 1 hour remove the foil and carry on roasting the chicken(s) in the oven for another 20 - 30 mins to crisp up the skin till it looks like the top right photo. Ensure the chicken(s) has/have cooked all the way through by piercing the skin and checking that the juices run CLEAR, if there is blood in the juices return to the oven and cook covered with foil (to speed up the process).
- To make a gravy from the juices in the tray start by straining the vegetables using a slotted spoon and reserve in a separate dish.
- To a cold saucepan add 2 tbsp of cornflour and dissolve using a little cold water - it is IMPORTANT to dissolve the cornflour using cold water otherwise you will end up with a lumpy gravy.
- Pour in the juices from the baking tray into the saucepan and turn on the heat/gas. Heat the gravy till it is reduced and thicker, you may want to add salt to your taste at this point.
- Once thickened to the consistency you like, pour into a gravy boat and keep warm for serving.
- Place the strained vegetables in a large dish and add the cooked chicken(s) on top. Serve the Spicy Chilli Garlic Chickens with roasted potatoes or a creamy buttery mash and savour the flavour!
If you like the recipe please share with friends and family, also follow me on Facebook and Instagram. Questions? Leave a comment below or message me on Facebook.


Kay
Made this for iftaar, it was really tasty the whole fsmily loved it, Thanks alot?
Shabana
Hi, I was just wondering could this recipe be used on chicken wings or drumsticks rather than a whole chicken? As my oven is quite small.
Thanks in advance!
afelia’s kitchen
Hi Shabana, I don’t see why not, I’m sure drumsticks would work well with this recipe. Let me know how it turns out! ? x
Shabana
I will!
Runa
Mā shāʾ Allāh your So talented sister I will be making thing from your recipes
afelia’s kitchen
Look forward to seeing your cooked dishes via Facebook or Instagram. x