
These savoury rice flour snacks are a taste which take me back to my childhood; my mum would make these fresh at the weekend and she would serve it with a meat or chicken curry, simply delicious! A popular morning/afternoon snack in Bangladesh, Nunor Bora are commonly served on the day of Eid (Muslim celebration). They are made by boiling water and adding onions, ginger, seasoning and rice flour/ground rice to create a pliable dough; this dough is then rolled and cut into shapes, after which they are deep fried in oil till golden and crispy. My daughter is crazy about Nunor Bora and loves them so much she will happily eat them at any given opportunity, she has a thing for salty snacks let’s say! One of the best things about making Nunor Bora is that it keeps for weeks once frozen and is thus ideal for making ahead of time and storing in your freezer for those unexpected guests.
There are many ways to make Nunor Bora, some people add a combination of plain flour, rice flour and/or ground rice. Rice flour is finely milled whereas ground rice is rather more gritty in texture, combined they make a good mix. I’ve made mine using both rice flour and ground rice as I find using only ground rice makes the dough very hard and using only rice flour makes the dough too soft. I don’t add any plain flour to my dough but you could add this if you don’t have rice flour and have only ground rice at home. My Nunor Bora are soft but crunchy and I like them like this, you can always play around with the quantities to make them how you like; add more ground rice if you want firmer, crispier boras or reduce the ground rice and use more rice flour should you want softer boras. I use a ratio of 1 cup rice flour to 1/3 of a cup of ground rice and this works for me, adjust this if it doesn’t suit you.
In this instance I have also added ground Panch Puran (Indian Five Spice) and chopped coriander but this is optional and your boras will be just as tasty without the five spice and coriander, I just feel they lend more flavour and fragrance to the boras when added. If you wanted to experiment you could try adding Nigella seeds (Kalonji/Kali Zeera) to the dough or even some pickle to give the boras a different taste, Mr Naga pickle springs to mind! The original recipe has to be without a doubt the most preferred and will definitely be the one you turn to time and time again.
Makes 70 – 80 Nunor Bora (depending on width and diameter)
You will need:
1 pint water
2 large OR 4 small onions
1 large stem of ginger (thumb size piece)
2 tsp salt
1 1/2 tsp turmeric
1/2 tsp of panch puran (optional)
2 cups rice flour (approx 300g)
2/3 cup ground rice (approx 120g)
chopped coriander (optional)
Method:
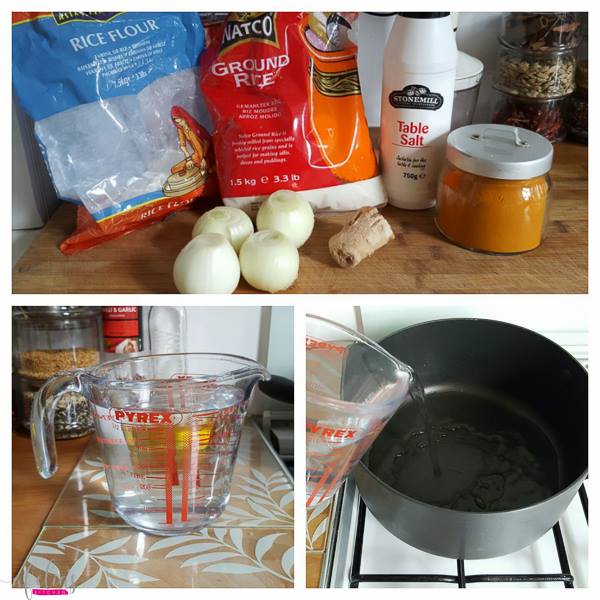
Start by bringing to boil 1 pint of cold water in a large saucepan.
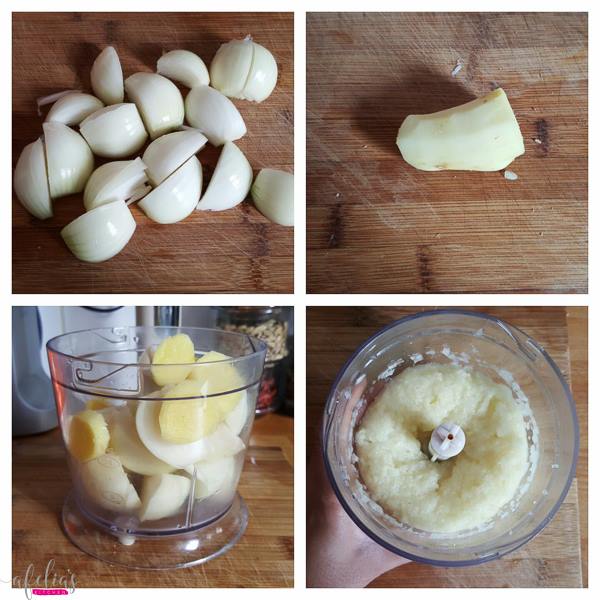
Meanwhile peel and chop the onions and peel the stem of ginger. I am using my mini chopper to blend the onions and ginger, if you don’t have this use a food processor or a grater, the onions and ginger should be finely blended.
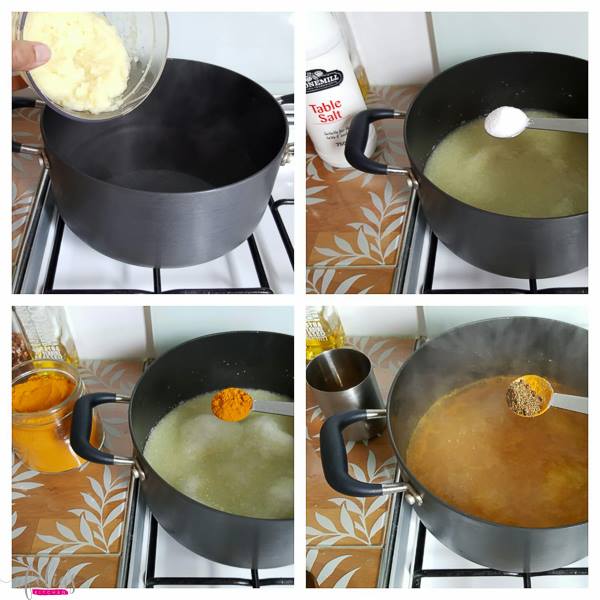
Add the blended ingredients to the boiling water along with 2 tsp of salt, 1.5 tsp of turmeric powder and the last ingredient is optional 1/2 tsp of ground panch puran; the ground panch puran adds a really lovely taste and aroma but isn’t too overpowering.
After adding the salt/spices cover and leave to simmer for 10 mins.
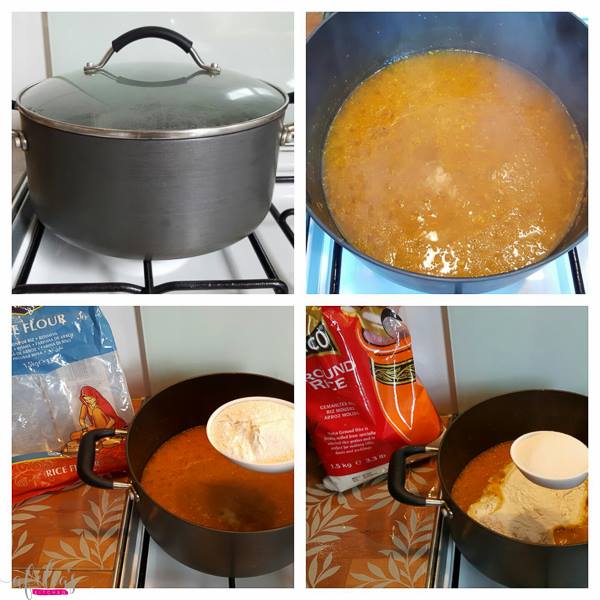
After 10 mins check to see if the onions look translucent and cooked (top right photo), when they do you are ready to add the rice flour/ground rice. Turn the heat down to low and add 2 cups of rice flour, followed by 2/3 of a cup of ground rice, the flours will be absorbed into the liquid immediately….
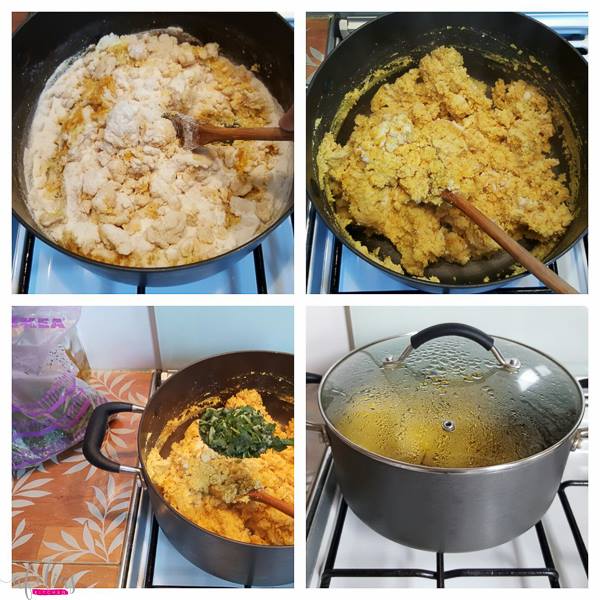
….stir the flour/ground rice using a wooden spoon and ensure that there are no dry patches (top right photo). If you want to add coriander (optional but also adds a lovely fragrance and colour to the boras) now is the time to add it; I added 3 tbsp of chopped frozen coriander.
Mix well, cover and leave to cook for about 15 – 20 minutes over a low flame. You will know when the dough is ready as there will be water droplets forming on the lid (it helps to do this in a pot with a glass lid for this reason) and the mixture will release a lovely aroma once cooked.
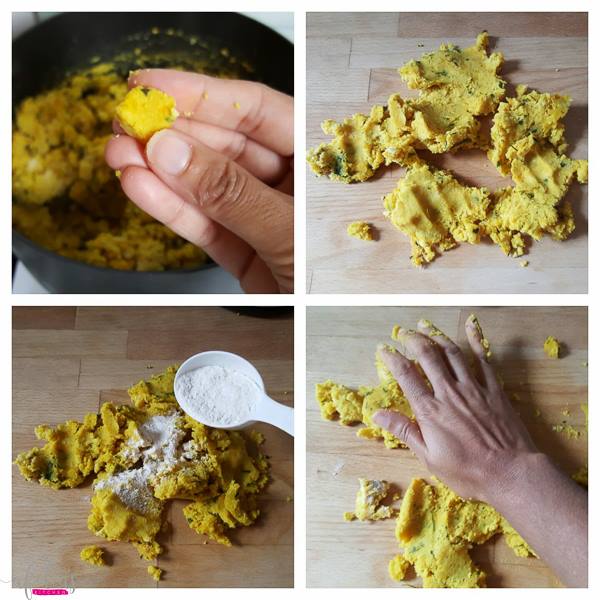
To check the dough is fully cooked, take a pinch of the mixture and roll back and forth between you fingers, it should come together quite easily. If for any reason it feels too sticky, add some more rice flour to absorb the moisture; if it feels too dry, sprinkle a little water over and allow to steam for a few more minutes.
Once the dough is ready take some out of the pan and allow to cool on the counter. I found the dough mix was a little wet while hot so added some rice flour to aid me rolling it together.
Using the base of your palm, knead the mixture thoroughly against the counter, as you do so you will find the mixture comes together….

….to form a ball of dough. I like to use my dough scraper to remove any dough stuck to the worktop.
Carry on kneading the mixture till you have formed several balls of dough.
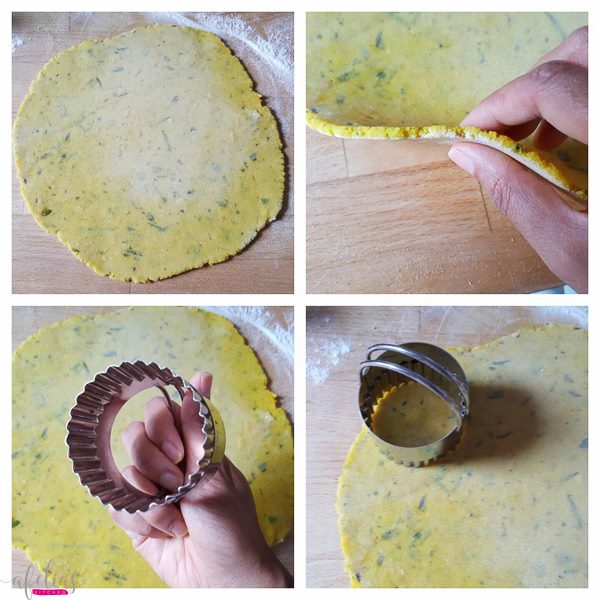
Next you want to take a ball of dough and using a rolling pin roll it out as shown in the top left photo. I like a medium thickness of about 3 – 4mm for my Nunor Bora (not too thick and not too thin), as shown in the top right photo.
Cut the rolled out dough using a pastry cutter; my pastry cutter has a crimped edge but a plain one is fine too. If you don’t own a pastry cutter you may use a sharp rounded lid or object to cut a clean round. Starting at the edge work your way round the pastry until you have cut out as many Nunor Bora as you can.
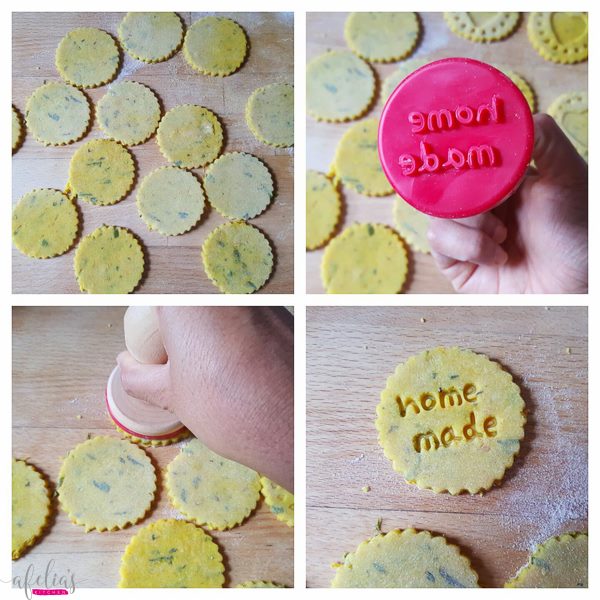
After cutting my Nunor Bora I like to personalise them using a cookie stamp, this adds a really unique finishing touch to homemade snacks.
Taking my cookie stamp, I gently press down on the boras one at a time till I can see the stamped lettering. Do this for as many boras as you like.
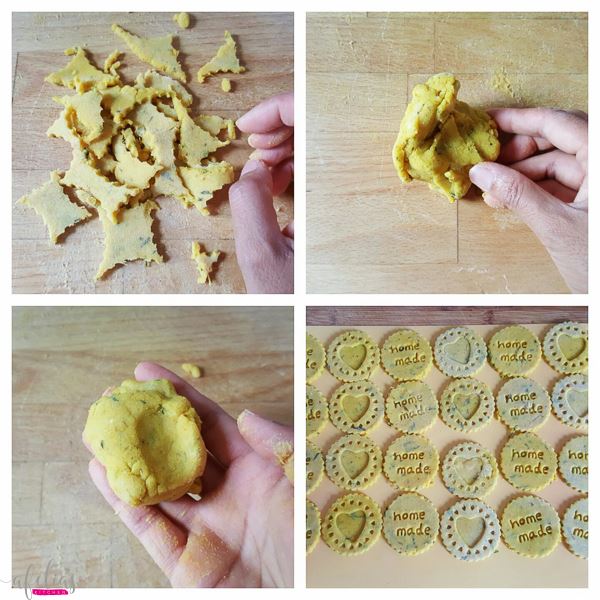
Take the remaining scraps and roll them back into a a round ball, repeat the process of rolling out and cutting till all the dough has been used up.
I like to place my Nunor Bora on flexible plastic chopping boards in the freezer to harden up, this makes them easy to remove and place in a bag/container. You can also place more than one layer on top of one another this way.
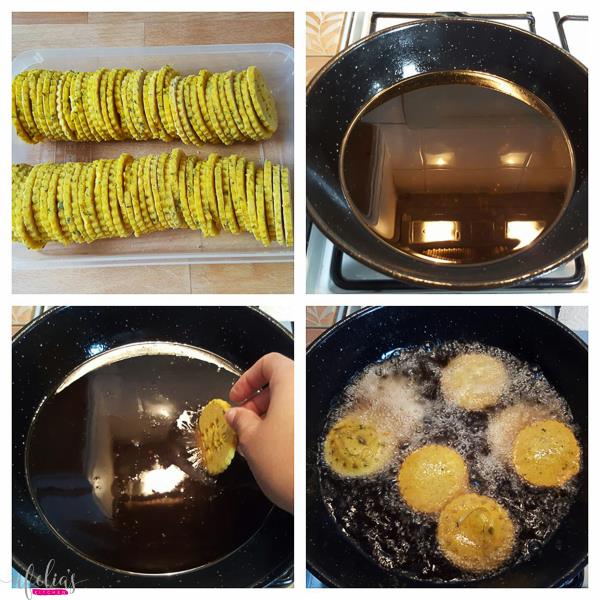
Once the boras are hard, transfer them to a container/freezer bag.
To cook the boras heat a large wok with some oil. Once the oil is hot slide in the boras carefully from frozen, you may want to defrost them for a minute or so to make them splutter less in the oil. Make sure the oil is HOT before adding the boras otherwise they will absorb a lot of oil, won’t puff up and won’t be crispy.
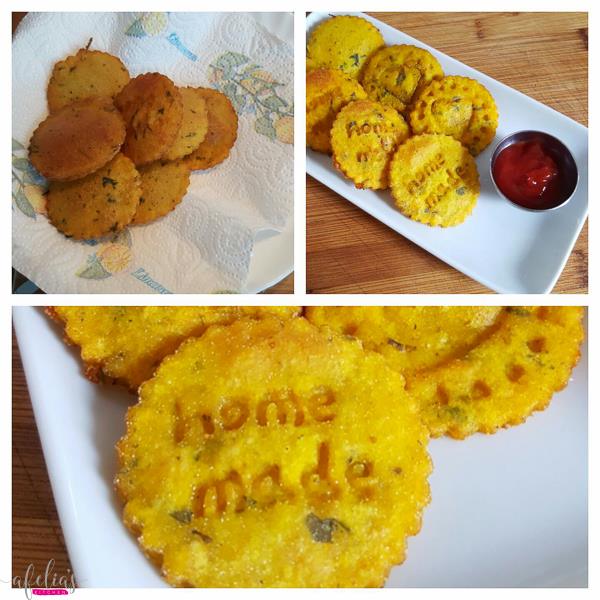
Place the cooked boras onto a piece of kitchen paper to absorb all the excess oil.
Serve the Nunor Boras immediately just as, with ketchup/chilli sauce or enjoy them with your favourite curry!
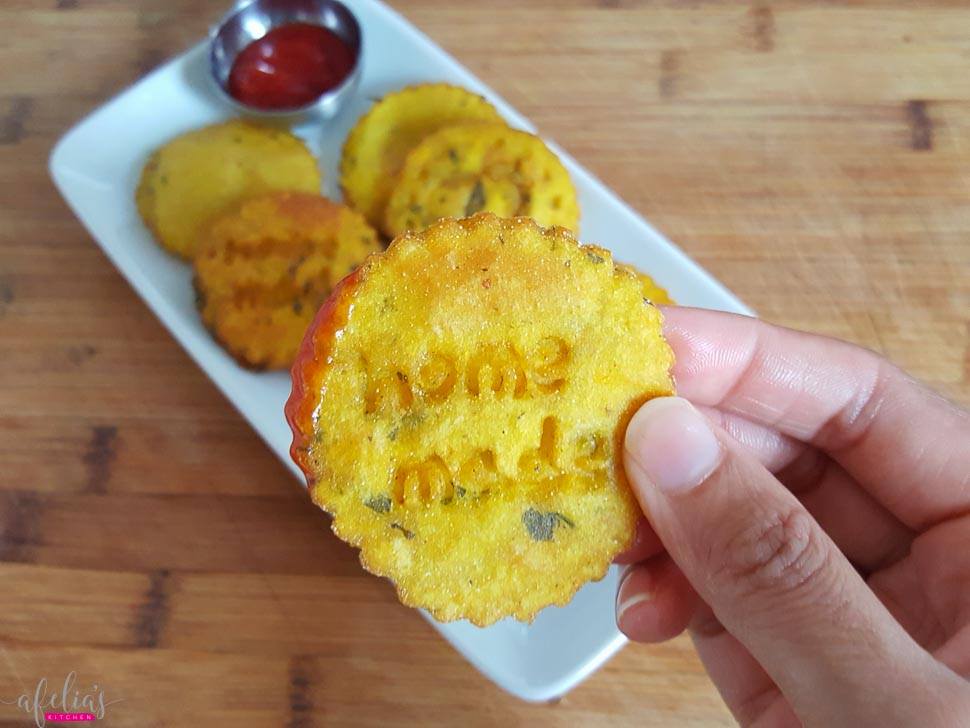
These are just so moreish, once you start eating them, you can’t stop!
Bon Appetit!

- 1 pint water
- 2 large OR 4 small onions
- 1 large stem of ginger (thumb size piece)
- 2 tsp salt
- 1½ tsp turmeric
- ½ tsp of panch puran (optional)
- 2 cups rice flour (approx 300g)
- ⅔ cup ground rice (approx 120g)
- chopped coriander (optional)
- Start by bringing to boil 1 pint of cold water in a large saucepan.
- Meanwhile peel and chop the onions and peel the stem of ginger. I am using my mini chopper to blend the onions and ginger, if you don't have this use a food processor or a grater, the onions and ginger should be finely blended.
- Add the blended ingredients to the boiling water along with 2 tsp of salt, 1.5 tsp of turmeric powder and the last ingredient is optional ½ tsp of ground panch puran; the ground panch puran adds a really lovely taste and aroma but isn't too overpowering.
- After adding the salt/spices cover and leave to simmer for 10 mins.
- After 10 mins check to see if the onions look translucent and cooked (top right photo), when they do you are ready to add the rice flour/ground rice. Turn the heat down to low and add 2 cups of rice flour, followed by ⅔ of a cup of ground rice, the flours will be absorbed into the liquid immediately....
- stir the flour/ground rice using a wooden spoon and ensure that there are no dry patches (top right photo). If you want to add coriander (optional but also adds a lovely fragrance and colour to the boras) now is the time to add it; I added 3 tbsp of chopped frozen coriander.
- Mix well, cover and leave to cook for about 15 - 20 minutes over a low flame. You will know when the dough is ready as there will be water droplets forming on the lid (it helps to do this in a pot with a glass lid for this reason) and the mixture will release a lovely aroma once cooked.
- To check the dough is fully cooked, take a pinch of the mixture and roll back and forth between you fingers, it should come together quite easily. If for any reason it feels too sticky, add some more rice flour to absorb the moisture; if it feels too dry, sprinkle a little water over and allow to steam for a few more minutes.
- Once the dough is ready take some out of the pan and allow to cool on the counter. I found the dough mix was a little wet while hot so added some rice flour to aid me rolling it together.
- Using the base of your palm, knead the mixture thoroughly against the counter, as you do so you will find the mixture comes together....
- to form a ball of dough. I like to use my dough scraper to remove any dough stuck to the worktop.
- Carry on kneading the mixture till you have formed several balls of dough.
- Next you want to take a ball of dough and using a rolling pin roll it out as shown in the top left photo. I like a medium thickness of about 3 - 4mm for my Nunor Bora (not too thick and not too thin), as shown in the top right photo.
- Cut the rolled out dough using a pastry cutter; my pastry cutter has a crimped edge but a plain one is fine too. If you don't own a pastry cutter you may use a sharp rounded lid or object to cut a clean round. Starting at the edge work your way round the pastry until you have cut out as many Nunor Bora as you can.
- After cutting my Nunor Bora I like to personalise them using a cookie stamp, this adds a really unique finishing touch to homemade snacks.
- Taking my cookie stamp, I gently press down on the boras one at a time till I can see the stamped lettering. Do this for as many boras as you like.
- Take the remaining scraps and roll them back into a a round ball, repeat the process of rolling out and cutting till all the dough has been used up.
- I like to place my Nunor Bora on flexible plastic chopping boards in the freezer to harden up, this makes them easy to remove and place in a bag/container. You can also place more than one layer on top of one another this way.
- Once the boras are hard, transfer them to a container/freezer bag.
- To cook the boras heat a large wok with some oil. Once the oil is hot slide in the boras carefully from frozen, you may want to defrost them for a minute or so to make them splutter less in the oil. Make sure the oil is HOT before adding the boras otherwise they will absorb a lot of oil, won't puff up and won't be crispy.
- Place the cooked boras onto a piece of kitchen paper to absorb all the excess oil.
- Serve the Nunor Boras immediately just as, with ketchup/chilli sauce or enjoy them with your favourite curry!
If you like the recipe please share with friends and family, also follow me on Facebook and Instagram. Questions? Leave a comment below or message me on Facebook.


N
My go to recipe…easy to follow and tastes amazing!
afelia’s kitchen
Thank you. 🙂
Rahima
This has been my go to recipe for the past 6 years (basically since I got married)! I always have to go back to it, it’s delicious everytime, even my own mum agrees!
shazna begun
i just wanted to ask, could we mix the dough in a stand mixer? i mean once it’s cooked on steam,
just to knead the dough together?
afelia’s kitchen
Yes you can, some people do use their stand mixers for this, I just prefer to do it by hand because the dough can be quite stiff.
Jubada Begum
I made nonor bora on my own for the first time following this recipe and Alhamdulillah it was perfect. Soft on the inside and crispy outside. I have already shared this recipe with my friends and family. Thank you for sharing xx
Rupsana
Thank you so much for these amazing recipes. I have learnt alot from you and your traditional recipes have never failed Alhamdulillah. May Allah bless you.. you are a very clever woman Afelia, for every recipe we are making from your efforts will weigh heavily on your book of deeds InshaAllah! Xxxx
Ru
During this covid crisis it means I’m not able to visit my parents home this Eid , which means I miss out on her boras and handesh ! Your page makes cooking these traditional recipes easy to follow, I can now proudly say I can make handesh !! . So Thankyou for sharing !! Stay blessed x
Faiza
I will always give 5 stars for all off Afelia’s recipes…they are amazing. Made these lovely treats for iftari last night…went down a treat with the other curried dishes I made 😋. Your recipes are so nice and easy to follow. Allah swt bless you and your family for spending the time to upload these delicious recipes🤲
afelia’s kitchen
Ameen. I’m so happy the recipes help you out, thanks for the amazing feedback! xx
Sayeda
First time making bora and everyone was so impressed. Just made a batch for my mil. Thank you for all the recipes that you post.
Salima
Making these delights right now!
I’m not normally much of a cook but was craving these today.
Love your recipes and how easy they are to follow, it’s not the first I’ve used the. and won’t be the last!
Thank you so much for making our lives that tad bit easier. Much love & God Bless
Husna
I followed your recipe for nunor Nora today for Eid. it came out perfect and taste amazing.
Easy to follow steps too.
Making soi fita and chicken roast tomorrow. Can’t wait.
Thank you 😊
afelia’s kitchen
You’re most welcome. x
Shelema
I had followed a recipe from someone else and it just didnt taste right so I was sceptical about trying this one. Glad I did, tastes really lovely, my whole family loved it. Will be making again for Eid!
afelia’s kitchen
Lol, should’ve come here first hey? 😀 xx
Fatima
Brilliant. Tried this recipe last year and it was the best and easiest recipe. Now I just search your recipe and use it all the time. JazakAllah alkhairan 😘
afelia’s kitchen
I’m so happy it works for you! 🙂 x
Anjum
Have made these multiple times and have taken me next to nothing to make them. Very very good recipe (coming from a non-Bengali)
afelia’s kitchen
I’m so happy the recipe works for you! 🙂 x
Fatima
Jazakallah for sharing this easy to follow recipe. My MIL asked me to make this once on my own. I didnt have time to ring my mum for help lol everyone enjoyed it Alhamdulillah and i have always used your recipe since!
afelia’s kitchen
Aww bless, I love knowing you guys find Afelia’s Kitchen the next best thing to asking mum! 😀 xx
Fatima
My first ever attemp on making these bora and I was not dissapointed! They tasted amazing…everyone should definitely put in the Panch Puran! And they puffed up perfectly. Thank you again for sucha easy step by step recipe xx
afelia’s kitchen
So glad the recipe worked for you! 🙂 xx
L
Thank you so much for your beautiful recipes. Used this and the handesh recipe for eid 2018. Perfect ma shaa Allah. X
afelia’s kitchen
I’m so glad they worked for you! 😀
Shipa Chowdhury
First time I’ve made nunor bora using your recipe. I wasn’t nervous or worried how they would turn out as I always know your recipes are fool proof!
And I was right. Masha Allah they turned out perfect and soft, just the way I like them. Love how you explain everything clearly about how to make it softer or crunchy.
Jazak Allah sis, may Allah swt always shower his blessings and mercy upon your family 💖💖.
afelia’s kitchen
Ameen. Thanks for the review and feedback. 🙂
Rahima
Thank you so much for this recipe! I’ve always seen my mum make this but I’ve never quite understood the process…and when I got married I realised this is one of those ‘must have’ Bengali snacks in the house! I just made a batch the other day using your recipe and it came out great! Frozen a few too for eid…:) once again thank u xx
Emma
I’ve got to say this is the perfect recipe to make the bora’s. Thank you for sharing
Sonya
I’ve made these many many times and they come out perfect every time! JazakAllah for sharing your recipes, I’m familiar with them but love your twists! (In this case, panch puran) my little toddlers also loooove these so it’s a thumbs up from them too ! Thank you for all the hard work you put in to these recipes and on Instagram! X
Jas
Salam sis, made this nunor Bora and it came out perfect bcoz ive been trying so many times but with ur recipe Alhamdulillah beautiful 😋
Sabiha
Dear Afelia,
I’m currently living in Jordan, and sourcing ingredients for desi dishes is proving a challenge! May I ask: is it feasible to use just rice flour for this recipe or are both types essential?
Thanks for all the fabulous recipes on here!
afelia’s kitchen
I would recommend you use both as rice flour alone is too fine and will make the dough too soft. However if you find it difficult to source you could perhaps make your own ground rice by washing and soaking some rice in water for a few hours, spread it out to dry on a tray and allow it to dry and then pulse in a food processor but not too fine, that would also work. And if that seems like too much bother give it a go without but I’ve never tried it like that so not sure how it would work. x
Rubi
Always loved eating nonor bora, never was able to make it!
The elders were never able to give the measurements as they would eye ball in everything… leaving me confused on the amount of ingredient to use! Thankfully came across this recipe and made it for the first time 2017 Eid… I was amazed by the result! It came out perfect! Making it today agai coz cant wait till Eid 😋
Thank you for sharing xxx
Umm Amilah
Such brilliant instructions! Thank you for taking the time out to make this so thorough. Today was my 1st time making it and it came out nice.
Cakes by Riba
Hi i made these last Eid for the family and they enjoyed it so much
Ur instructions are very clear hence made the process soo easy thanku so much
Not sure how to attach a photo otherwise would have showed u
afelia’s kitchen
That’s excellent, so glad you were able to make them for your family and found the instructions clear to follow. 🙂 x
Sham
I made these following your recipe and they came out ?i wanna try the gur handesh but feeling nervous as I’ve failed in the past ?
Taslema Islam
Just made these for Eid came out perfect and taste delicious! The recipe is easy to follow and the pictures make everything clear to understand. Thank you so much for putting these recipes up.
Shelina begum
Jazak Allah for sharing. Can’t wait to try the recipe.
afelia’s kitchen
You’re welcome, I hope the recipe works well for you. x
Jaz4Jay
Thank you very very much for giving your time and sharing your receipes with us❤️
Normally when I make nunor bora’s there’s always complaints of some sort but Alhumdulillah when I followed your recipe no one complained! Everyone LOVED IT☺️?
Taslima Begum
Made these for Eid ul fitr.. the recipe was so easy to follow.. my family were soooo surprised I made these on my own without their help.. thank you so much for sharing.. Im going to try more of your recipes soon.. xx
afelia’s kitchen
Yay, you’re welcome! So happy you were able to successfully execute the recipe all by yourself. 🙂 xx
Shuma
Adding the panch puran gives this a great taste which i have never done before. Always followed my mums recipe which has been replaced with your’s lol.
Shuheli
Made this bora today fantastic and easy to follow recipe have just stored in freezer ready for eid!
Sophia
Made this today . Came out really good. Recipe is soo easy to follow as usual. Thank you.
afelia’s kitchen
Great, thanks for leaving a review! 🙂
Jumia
Made it twice so far. Second time, doubled the quantity to make enough as first batch finished in one day!!!! This recipe is absolutely delicious!! My mother-in-law also agrees ?
afelia’s kitchen
Awww bless, so happy you enjoy them. xxx
Helwa Cakes and Bakes
Thanks so much sis. Really simple and easy to make, used this aswell as my mum’s advice. They came out fab.
afelia’s kitchen
You’re welcome, so happy you found the recipe easy to follow! 🙂 x
Sadaf
I tried these bora’s last week and they turned out AMAZING!!! Was so easy to make! Thank you afelia for all your recipes I have tried many and they have always turned out great!! Well done and keep up the hard work 🙂 xxx
afelia’s kitchen
Thank you so much, I look forward to your reviews on some of my other recipes. 🙂 xx
Tisha Reza
This is my go to recipe for noonor bora now. I used to find making these so daunting. Having exact measurements helps so so much and they taste ahhhhmazing!!
afelia’s kitchen
Aww I’m so pleased the recipe works for you! 🙂 x