
During Ramadan 2018, you may have seen me create themed Iftar tables, one of which was an Italian themed table. I made a variety of homemade pizzas using this recipe and in keeping with the Italian theme, decided to make cannoli for dessert. The problem I encountered when searching online for a cannoli recipe was that they all contained wine, either marsala, white wine or alcohol of some sort! UGH!!! So I decided to improvise and create my own recipe – Afelia’s Cannoli was the result.
This isn’t the most authentic Italian cannoli recipe out there as I haven’t used ricotta for the filling, but that’s because I don’t enjoy the grainy texture of ricotta, I much prefer the texture of mascarpone for a sweet filling or just whipped double cream and seeing as double cream was all I had at home, that’s what I used. If however you do want to use something that is thicker than double cream, opt for ricotta or mascarpone, whisk till smooth, sweeten with sugar just like I have done to the double cream and use accordingly. Authentic Italian cannoli filling sometimes has other ingredients added to it; cocoa powder, chocolate chips and candied fruits are popular choices, you can try adding these should you wish to do so.
In place of alcohol, which seems to be a pretty important ingredient in all the recipes I checked out, I used apple cider vinegar instead, it was the closest thing to alcohol I could think of using which is halal, so I opted for that. If you don’t have apple cider vinegar you may want to try just regular white vinegar, I think this would have the same result. I wouldn’t recommend using malt vinegar however, as it has a stronger and more pungent aroma which may be detectable once the pastries are cooked. You could also try using grape juice in place of vinegar, although I haven’t tried this myself so don’t know how it would work.
I have used a refined vegetable fat (vegetarian lard) for the pastry as I think it makes for a better pastry and makes the pastry crispier and flakier. There are many different brands available and most major supermarkets will stock a variety, any brand will do. If however you find it difficult sourcing vegetarian lard just use butter instead, but make sure it’s BUTTER and NOT margarine!
The key to nailing this recipe is to knead the dough until it is elastic, this means you can roll the dough out very, very thin without tearing it, until it’s almost see through. This results in the perfect pastry which will fry to a crisp shell. If you don’t roll the dough out super thin, you’ll end up with shells that are puffy, soft and not crisp. If after frying the cannoli shells you still find your pastry isn’t crisp, blast them in a hot oven (gas mark 6, 392°F, 200° C for about 6 mins) or just throw them into your airfryer for 2 mins at 180°C.
You will need to invest in cannoli tubes if you want a professional looking finish, if however you don’t have these to hand you can still attempt this recipe, use foil instead to create tubes that you can wrap the pastry around while frying. You will need a cutter to cut out the pastry, my cutter measured 10cm in width but you can make them smaller if you prefer (might take you forever to cut and fry them though, so bear that in mind when choosing how big/small you make them).
I haven’t really had a chance to play around with this recipe, it’s been highly requested so I’m sharing it already, but I can see myself tweaking it to make it better. I can see myself changing it up by adding additional ingredients to the pastry dough ie. ground cinnamon, ground ginger or even cocoa powder, to not only add flavour but also look different. I think adding some vanilla, lemon or orange essence to the filling would work a treat too, just some ideas you may want to explore.
I took the cannoli photographed in this recipe to a family gathering and they were very well received, everyone loved them! I mean what’s not to love?
Pastry? Yes please!
Whipped cream? Double please!
Nuts, chocolate and fruit? Puh-leeez have mercy!
I know you don’t need further convincing, so let’s begin!
Makes approx 35 – 40 shells
You will need for Afelia’s Cannoli
2 cups of plain flour (actual measuring cups NOT any random cup)
1 tbsp refined vegetable fat (I have used Cookeen but Trex, Crisco or any other brand will work too)
2 tbsp white sugar
2 eggs (one egg for the pastry and the other egg separated for when sealing the cannoli tubes)
1 tbsp apple cider vinegar (I bought this one from Aldi)
water as needed
oil for frying
cannoli tubes OR foil (to make homemade tubes)
For the filling:
1 pot double cream (use ricotta or mascarpone if you want a thicker filling)
2 tbsp white sugar
finely chopped pistachios
dark chocolate chips
pomegranate seeds
Method:

Start by measuring 2 cups of plain flour and add 1 tbsp of refined vegetable fat (vegetable shortening).
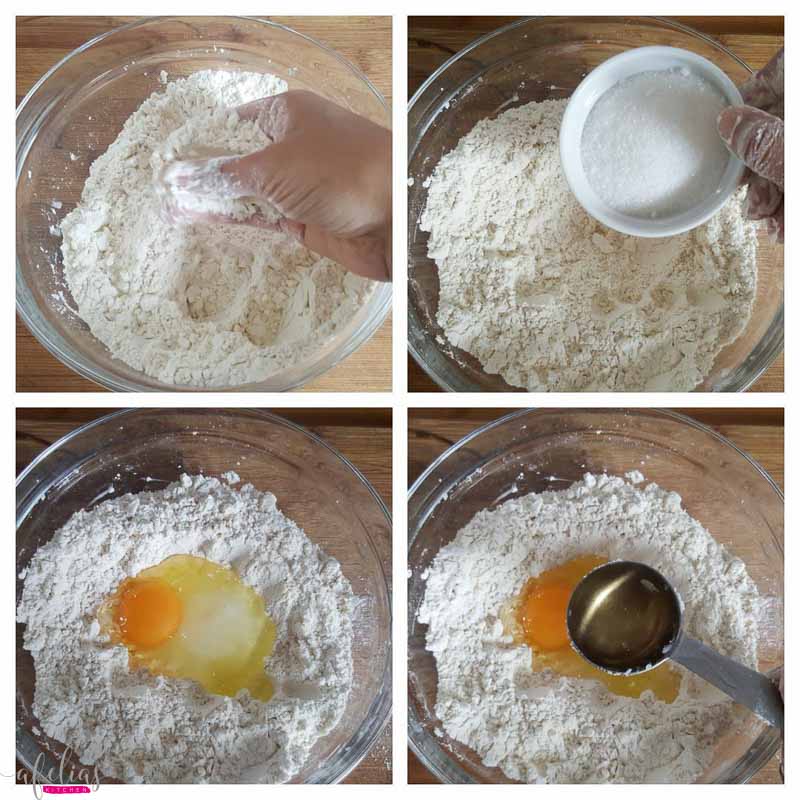
Gently rub the vegetable fat into the flour until combined.
Add 2 tbsp of white sugar, 1 egg and 1 tbsp of apple cider vinegar.
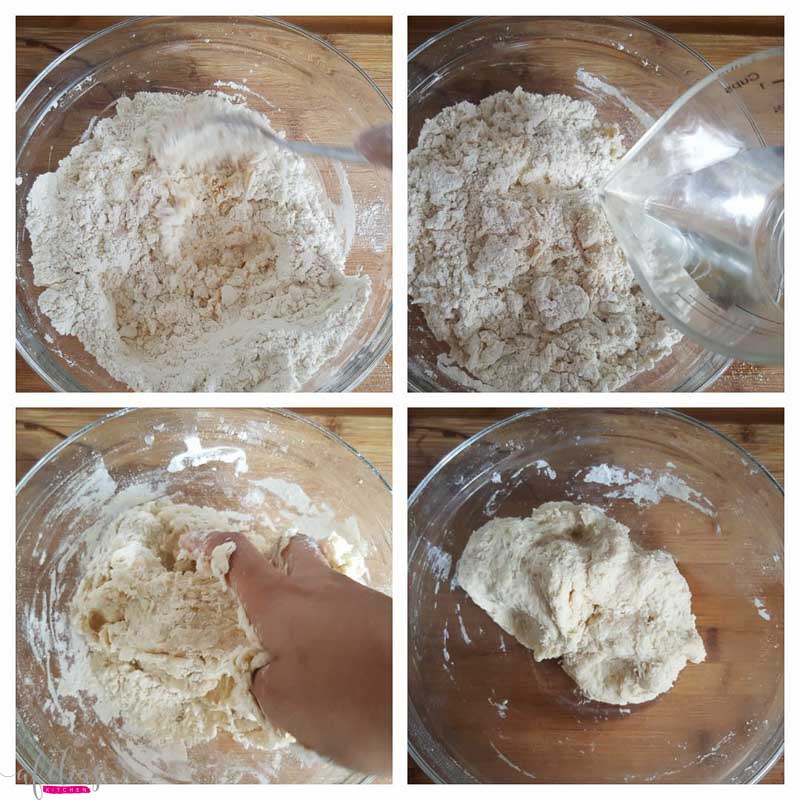
Use your hand or a spoon to combine the wet ingredients, once absorbed slowly begin to add water.
Add water a little at a time until the ingredients begin to form a ball of dough, stop adding when the dough looks like the dough in the bottom right hand photo.
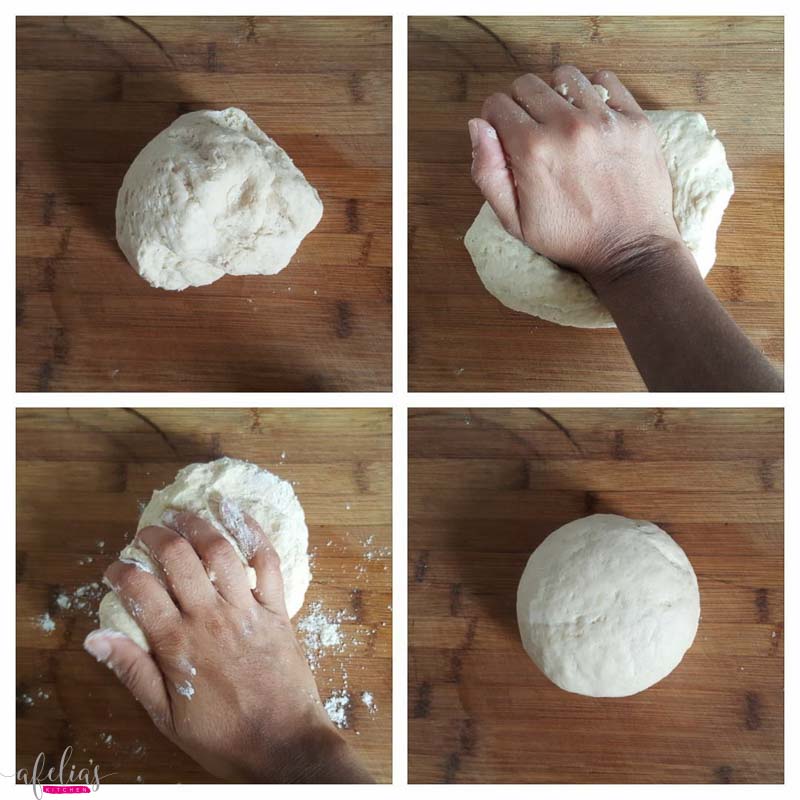
Tip the ball of dough onto your counter and begin to knead vigorously for between 3 – 5 minutes until the dough becomes smooth and elastic.
Sprinkle additional flour on the dough if it seems sticky.
Once smooth let the dough rest for 15 – 20 minutes (keep covered in a bowl), this helps the gluten to relax and will make rolling it out easier.
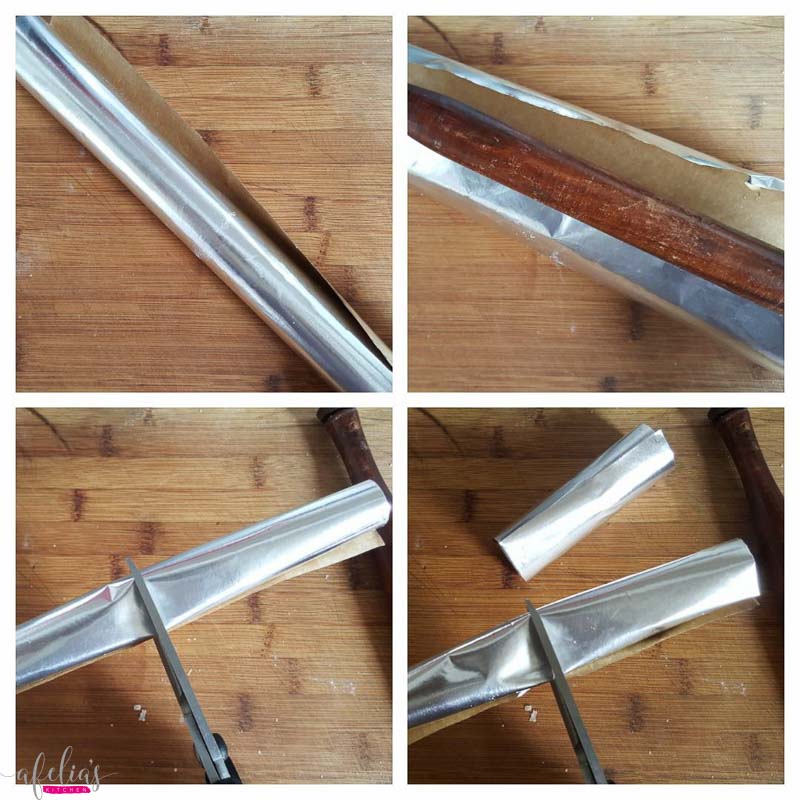
I didn’t have cannoli tubes when I made this (I do NOW **sigh, roll eyes**) but I improvised and made tubes out of foil.
I took a chapati stick and rolled around several layers of foil (make sure it’s fairly thick otherwise it won’t hold the pastry properly). If you don’t have a chapati stick, something the size/width of a permanent marker pen will work too.
My foil measured 30cm in length, I cut it into 3 equal sections, each tube measured 10cm.
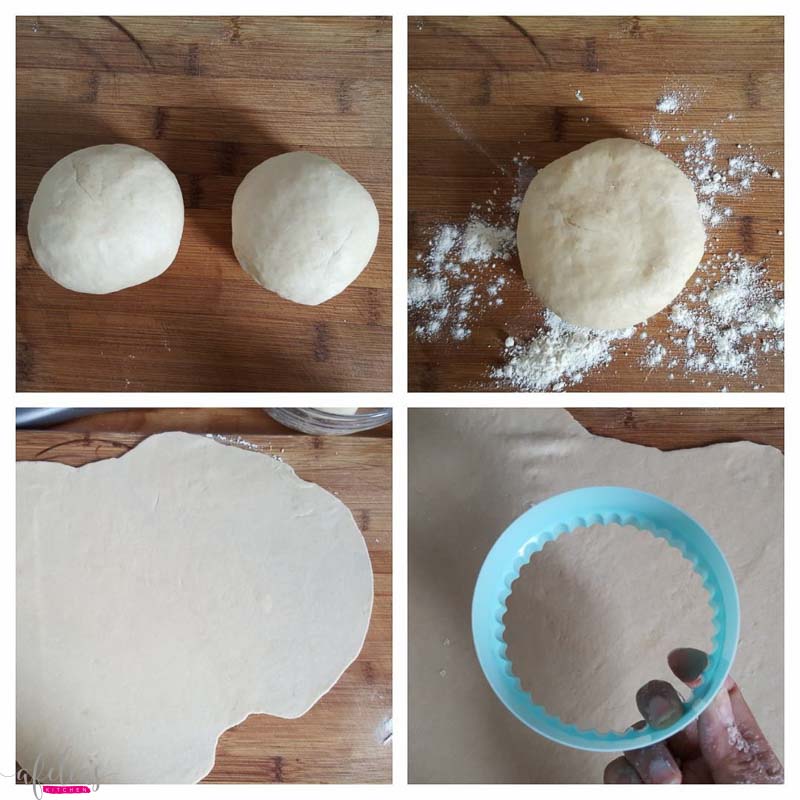
Once you’ve allowed the dough to rest for the said period you can divide it into 2 or 3 balls and begin to roll out – I would recommend dividing into 3 portions so you can roll it out thinner without taking up too much counter space.
Sprinkle some flour over your counter and roll the dough AS THIN AS POSSIBLE without tearing. The thinner the pastry, the crispier and better shaped your cannoli tubes will be. If you don’t roll the dough out thin enough, when frying the tubes they will puff up too much and lose their shape (as I discovered and as you shall see).
I used a plain cutter, 10cm wide to cut out the pastry.

This was the first batch I rolled out and fried, I’ve included these photos to demonstrate to you that you should roll the dough out THINNER than this, to get a better cannoli shell/shape.
If you haven’t already done so, separate one egg and use the white only for sealing the pastry.
Cut out a circle, fold one side over the cannoli tube, apply some egg white….
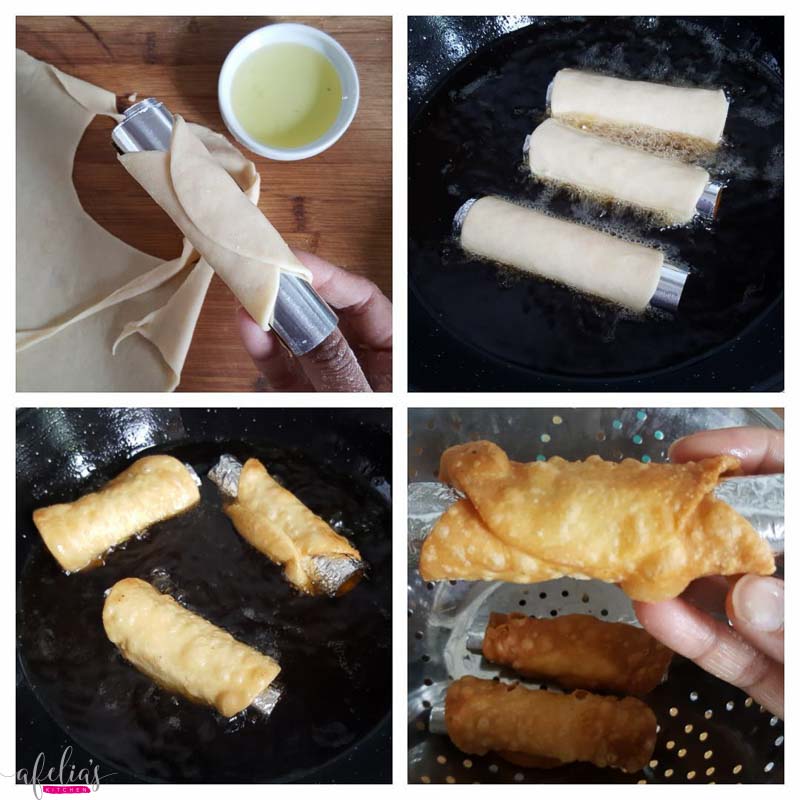
….and then fold over the other side to seal. Allow the pastry to sit for a couple of minutes before frying to allow the egg white to dry and act as a glue.
Repeat the process for the remaining cannoli tubes.
Heat some oil in a deep pan and fry the cannoli shells, a few at a time, over a medium high heat – take care not to overcrowd the pan or brown the shells too quickly as this will result in soft pastry instead of crispy pastry. It’s better to fry them slowly to dry out the pastries as much as possible.
Drain the tubes in the pan before placing them on a well ventilated surface/dish; using a wire rack or colander works better as the pastries need to cool down to become crispy, if they are clumped together they will steam and go soft.
Remove the cannoli tubes whilst the shells are still hot/warm, if they cool down too much the tubes will be difficult to remove from the hardened shell.
In the bottom right photo you can see that the shells blistered nicely but were too thick and weren’t as crispy as I wanted them to be. These first few cannoli shells were placed into my airfryer for a few minutes to cook and make them crispier. You can bake them in a hot oven for a few minutes if you don’t own an airfryer and find this happens to your shells.
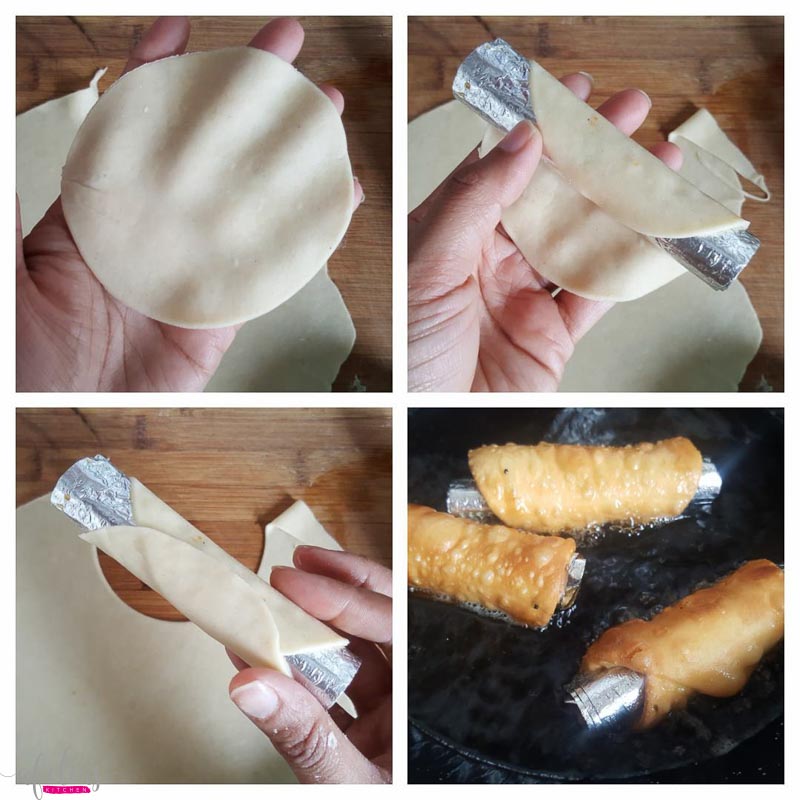
I managed to roll the next batch of shells out thinner and they retained a better shape than the first ones. I still think I could’ve rolled them out THINNER and recommend you do just that. Roll the dough out till it’s see through, paper thin. Got it? Good.
Continue to roll, cut and fry the shells as shown till you have used up all the dough.

The second batch were better shaped and were crispier because I rolled them out thinner. Place the cooked shells on a wire rack to cool completely.
You don’t have to use the shells immediately and can store them in an airtight container for up to 2 days. If for any reason they go soft, blast them in a hot oven for a few minutes (gas mark 6, 200°C, 400°F) to make them crispy again.
When you are ready to fill the cannoli shells you can use a selection of ingredients to decorate; I’m using finely chopped pistachio nuts, chocolate chips and pomegranate seeds.
To fill the inside of the cannoli shells I am using whipped double cream; for a thicker filling that holds better use ricotta/mascarpone if you prefer.
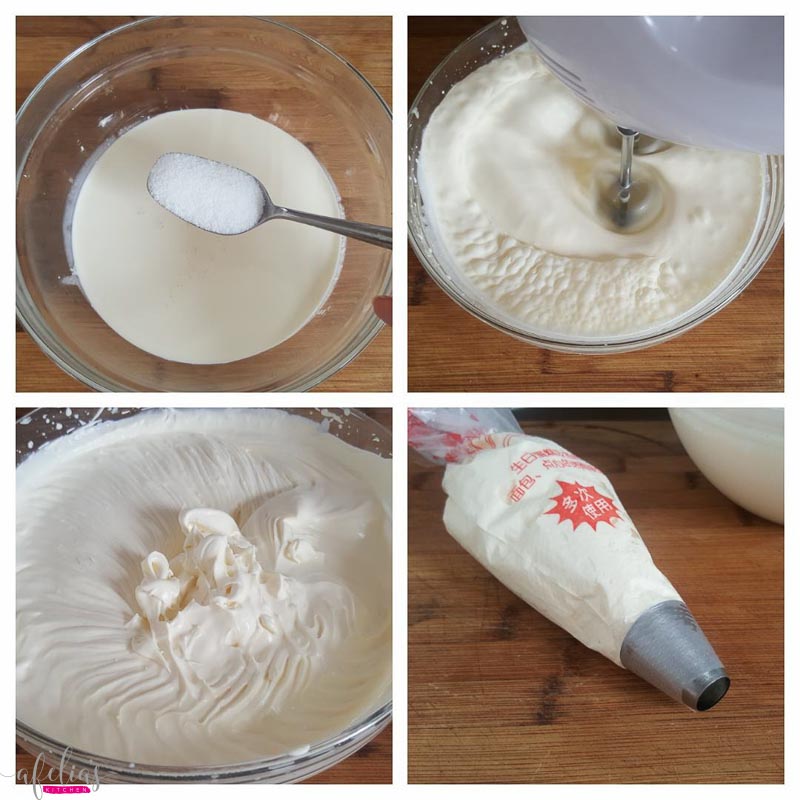
To one pot of double cream add 2 tbsp of white sugar.
Whip the cream using a stand mixer or handheld mixer until the cream is thick – take care not to over whip as the cream will turn into butter otherwise!
Once the cream is ready place it in a piping bag with a plain round nozzle, this will make piping the cannoli easier.
It is always best to fill the cannoli shells JUST BEFORE SERVING, avoid leaving them with the filling in for more than an hour as they’ll and up soggy and won’t be enjoyable.
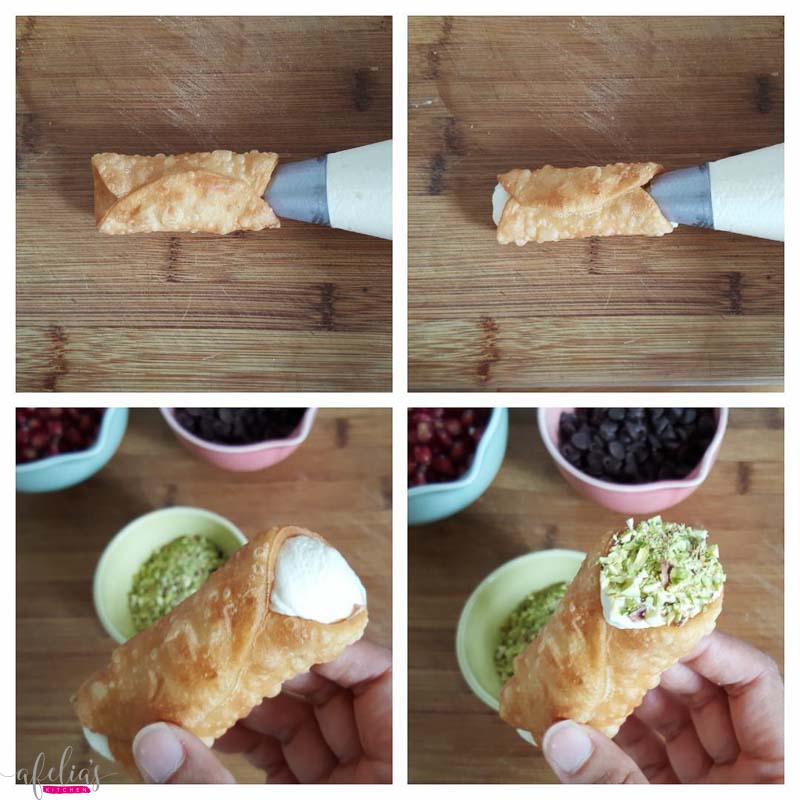
Pipe one end of the cannoli shell until the cream is visible on the end. Turn the shell and repeat for the other side.
Once the cannoli shell is filled, dip the ends into your chosen ingredients, here I have used finely chopped pistachios.
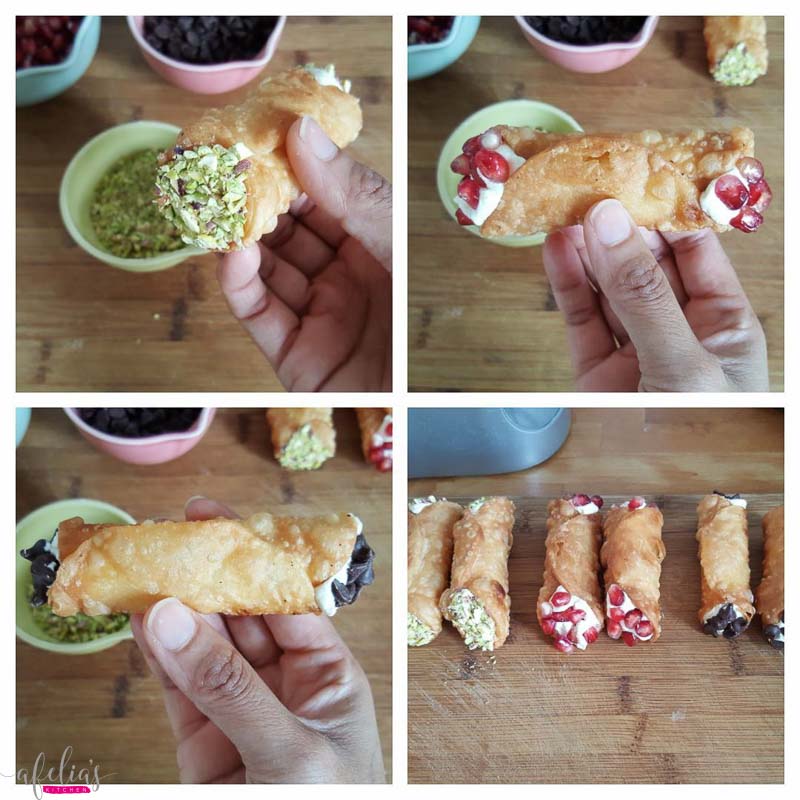
Continue filling the cannoli shells and decorating as you go. You’ll obviously want to taste test a few whilst doing this, think of it as quality control!
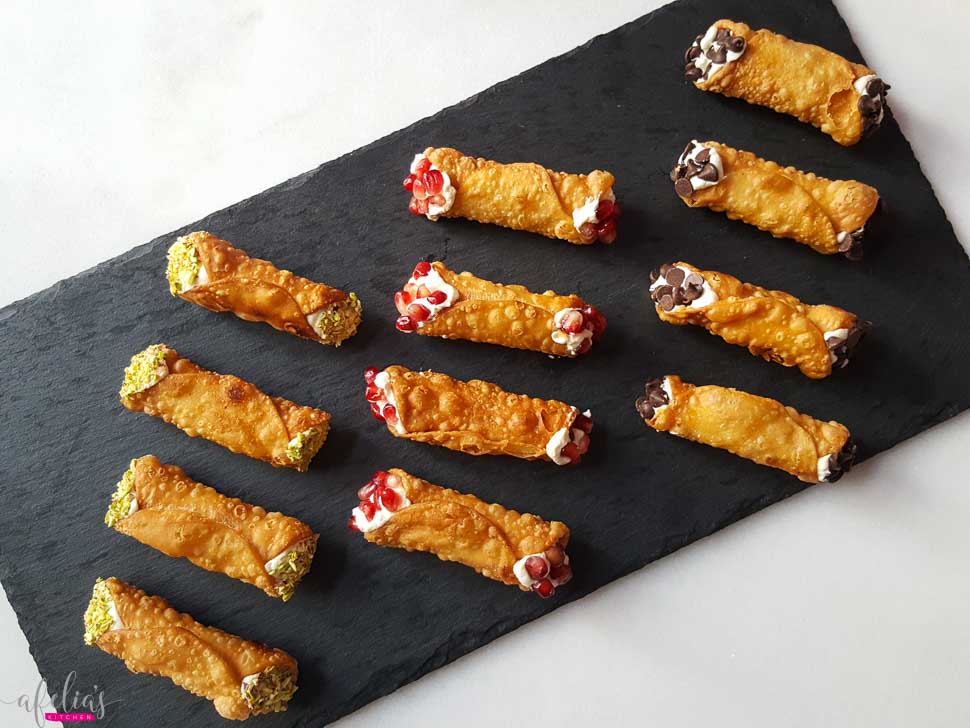
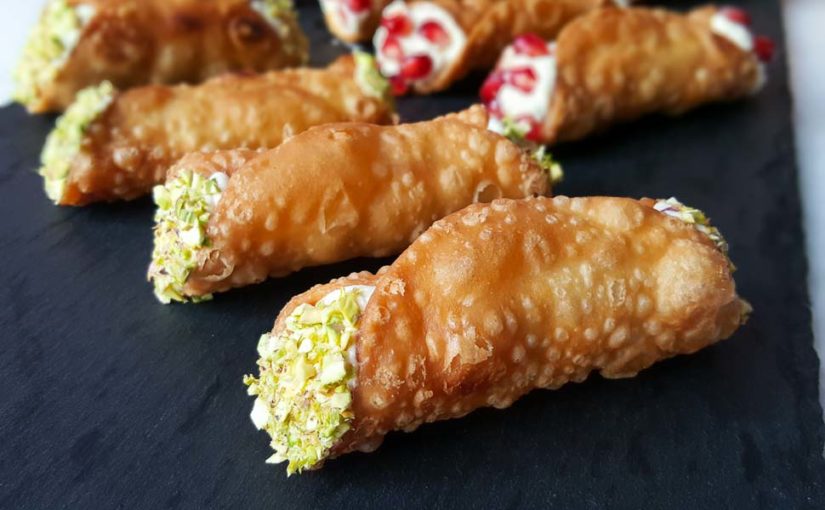
Serve the cannoli immediately and savour every mouthful. Be sure to make plenty as they disappear fast!
- 2 cups of plain flour (actual measuring cups NOT any random cup)
- 1 tbsp refined vegetable fat (I have used Cookeen but Trex, Crisco or any other brand will work too)
- 2 tbsp white sugar
- 2 eggs (one egg for the pastry and the other egg separated for when sealing the cannoli tubes)
- 1 tbsp apple cider vinegar (I bought this one from Aldi)
- water as needed
- oil for frying
- cannoli tubes OR foil (to make homemade tubes)
- 1 pot double cream (use ricotta or mascarpone if you want a thicker filling)
- 2 tbsp white sugar
- finely chopped pistachios
- dark chocolate chips
- pomegranate seeds
- Start by measuring 2 cups of plain flour and add 1 tbsp of refined vegetable fat (vegetable shortening).
- Gently rub the vegetable fat into the flour until combined.
- Add 2 tbsp of white sugar, 1 egg and 1 tbsp of apple cider vinegar.
- Use your hand or a spoon to combine the wet ingredients, once absorbed slowly begin to add water.
- Add water a little at a time until the ingredients begin to form a ball of dough, stop adding when the dough looks like the dough in the bottom right hand photo.
- Tip the ball of dough onto your counter and begin to knead vigorously for between 3 – 5 minutes until the dough becomes smooth and elastic.
- Sprinkle additional flour on the dough if it seems sticky.
- Once smooth let the dough rest for 15 – 20 minutes (keep covered in a bowl), this helps the gluten to relax and will make rolling it out easier.
- I didn’t have cannoli tubes when I made this (I do NOW **sigh, roll eyes**) but I improvised and made tubes out of foil.
- I took a chapati stick and rolled around several layers of foil (make sure it’s fairly thick otherwise it won’t hold the pastry properly). If you don’t have a chapati stick, something the size/width of a permanent marker pen will work too.
- My foil measured 30cm in length, I cut it into 3 equal sections, each tube measured 10cm.
- Once you’ve allowed the dough to rest for the said period you can divide it into 2 or 3 balls and begin to roll out – I would recommend dividing into 3 portions so you can roll it out thinner without taking up too much counter space.
- Sprinkle some flour over your counter and roll the dough AS THIN AS POSSIBLE without tearing. The thinner the pastry, the crispier and better shaped your cannoli tubes will be. If you don’t roll the dough out thin enough, when frying the tubes they will puff up too much and lose their shape (as I discovered and as you shall see).
- I used a plain cutter, 10cm wide to cut out the pastry.
- This was the first batch I rolled out and fried, I’ve included these photos to demonstrate to you that you should roll the dough out THINNER than this, to get a better cannoli shell/shape.
- If you haven’t already done so, separate one egg and use the white only for sealing the pastry.
- Cut out a circle, fold one side over the cannoli tube, apply some egg white….
- ….and then fold over the other side to seal. Allow the pastry to sit for a couple of minutes before frying to allow the egg white to dry and act as a glue.
- Repeat the process for the remaining cannoli tubes.
- Heat some oil in a deep pan and fry the cannoli shells, a few at a time, over a medium high heat – take care not to overcrowd the pan or brown the shells too quickly as this will result in soft pastry instead of crispy pastry. It’s better to fry them slowly to dry out the pastries as much as possible.
- Drain the tubes in the pan before placing them on a well ventilated surface/dish; using a wire rack or colander works better as the pastries need to cool down to become crispy, if they are clumped together they will steam and go soft.
- Remove the cannoli tubes whilst the shells are still hot/warm, if they cool down too much the tubes will be difficult to remove from the hardened shell.
- In the bottom right photo you can see that the shells blistered nicely but were too thick and weren’t as crispy as I wanted them to be. These first few cannoli shells were placed into my airfryer for a few minutes to cook and make them crispier. You can bake them in a hot oven for a few minutes if you don’t own an airfryer and find this happens to your shells.
- I managed to roll the next batch of shells out thinner and they retained a better shape than the first ones. I still think I could’ve rolled them out THINNER and recommend you do just that. Roll the dough out till it’s see through, paper thin. Got it? Good.
- Continue to roll, cut and fry the shells as shown till you have used up all the dough.
- The second batch were better shaped and were crispier because I rolled them out thinner. Place the cooked shells on a wire rack to cool completely.
- You don’t have to use the shells immediately and can store them in an airtight container for up to 2 days. If for any reason they go soft, blast them in a hot oven for a few minutes (gas mark 6, 200°C, 400°F) to make them crispy again.
- When you are ready to fill the cannoli shells you can use a selection of ingredients to decorate; I’m using finely chopped pistachio nuts, chocolate chips and pomegranate seeds.
- To fill the inside of the cannoli shells I am using whipped double cream; for a thicker filling that holds better use ricotta/mascarpone if you prefer.
- To one pot of double cream add 2 tbsp of white sugar.
- Whip the cream using a stand mixer or handheld mixer until the cream is thick – take care not to over whip as the cream will turn into butter otherwise!
- Once the cream is ready place it in a piping bag with a plain round nozzle, this will make piping the cannoli easier.
- It is always best to fill the cannoli shells JUST BEFORE SERVING, avoid leaving them with the filling in for more than an hour as they’ll and up soggy and won’t be enjoyable.
- Pipe one end of the cannoli shell until the cream is visible on the end. Turn the shell and repeat for the other side.
- Once the cannoli shell is filled, dip the ends into your chosen ingredients, here I have used finely chopped pistachios.
- Continue filling the cannoli shells and decorating as you go. You’ll obviously want to taste test a few whilst doing this, think of it as quality control!
- Serve the cannoli immediately and savour every mouthful. Be sure to make plenty as they disappear fast!


Niyatee
What if we dip the centre of shell in melted chocolate instead ?
afelia’s kitchen
That would work too I’m sure. 🙂