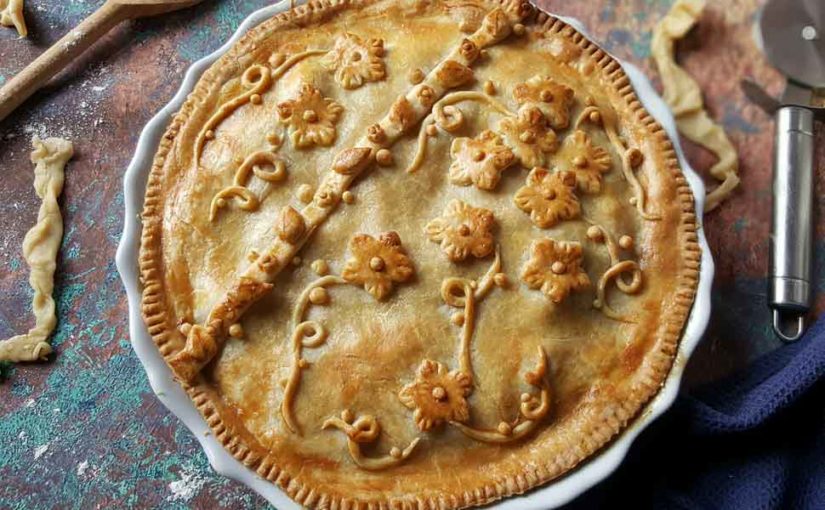
Quorn Pie
Prep time
Cook time
Total time
Author: Afelia's Kitchen
Serves: 6
Ingredients
- 300gm of Quorn Chicken Style Pieces (1 bag)
- 2 tbsp oil
- 1 large onion
- ½ tsp salt (adjust towards the end if needed)
- 3 medium carrots
- 150gm whole OR sliced green beans (fresh or frozen both work)
- 2 Oxo cubes (vegetarian)
- 4 - 5 tsp Bisto gravy granules (vegetarian one)
- water as needed
For the pastry:
- 500g plain flour
- 250g butter
- ½ tsp salt
- water as needed
- 1 whisked egg (for egg wash)
Method
- Peel and dice one large onion.
- Peel and dice 3 carrots.
- In a medium sized pan heat 2 tbsp of oil.
- To the hot oil add the diced onion along with ½ tsp of salt - it's better to add as little salt as possible now as the other ingredients also contain salt, you can adjust the salt later if you feel it necessary.
- Add the diced carrots and cook covered for several minutes over a medium flame.
- After several minutes add in the remaining ingredients; 300g Quorn Chicken Style Pieces, 150g runner beans (I'm using frozen) and crumble in 2 Oxo cubes.
- Lastly add 4 - 5 tsp Bisto gravy granules and about 300 - 350ml of cold water.
- Cover and allow the ingredients to simmer over a medium flame until everything is cooked through, approximately 10 - 12 minutes. The gravy granules will help thicken the sauce to the filling as it cooks.
- Once cooked, have a taste of the filling to make sure you are happy with the salt, adjust if needed. Also check the vegetables are cooked through, don't forget the filling will cook some more in the oven with the pastry, so the veggies don't need to be cooked till they're mushy like baby food.
- Leave the filling to cool to one side until needed.
- In a large mixing bowl weigh 500g of plain flour and 250g of butter; you may want to cut your butter into smaller cubes if you don't have a pastry blender (see next photo).
- Add ½ tsp of salt and start to work the butter into the flour using a pastry cutter or your hands.
- This little gadget helps to cut the butter into the flour easily, without warming the butter from the temperature of your hands. Cold butter rubbed into flour means flaky pastry.
- After cutting with the blender I used my hands, you can leave some larger chunks of butter in the mixture.
- Once the mixture starts to resemble breadcrumbs and looks like the bottom right photo, you can start to add water.
- Add water slowly a little at a time, as you add, mix to help the mixture to absorb the water.
- Once you can see the mixture starts to come together to form a ball of dough (bottom right photo), stop adding water and STOP KNEADING. Working the pastry too much means you'll end up with hard pastry.
- If there are any loose dry crumbs that don't attach easily to the pastry, you can dip your fingers into water and then use the moisture from your fingers to moisten the crumbs, that way you don't risk adding too much water by mistake. Push them into the dough once moistened.
- Preheat your oven to gas mark 5 at this point.
- Tip the dough onto your counter and shape into a round ball then halve.
- On a floured surface roll one half of the dough out into a large circle (or square/rectangle depending on what shape dish you are using).
- Carefully lift your rolled pastry and line the bottom of the dish you are using.
- Trim away any excess pastry (bottom left photo).
- Using a fork pierce the pastry all over, this will allow airflow and prevent bubbling.
- Scrunch some grease proof paper and line your pastry with it, use baking beans on top and blind bake the bottom pastry for 15 minutes at gas mark 5.
- THEN remove the beans (bottom right photo) and bake for a further 5 minutes, or until the bottom of the pastry looks cooked.
- Blind baking the bottom of the pastry will ensure the pie doesn't have a soggy bottom.
- This is what the bottom should look like once it's baked (top left photo).
- Add the cooled filling to the baked pastry and leave to one side while you prep the top and decorations.
- Roll out the second half of the pastry dough (add in the trimmings from earlier).
- I used a pizza cutter and a cake leveller to cut some strips from one side of the pastry and play around with some design ideas before I assembled the top (which basically means I had no idea what I was doing until it all came together at the end, this is fairly normal for me, lol).
- I cut strips (I was planning to make some plaits but in the end decided not to) and used miniature cutters to punch out leaves and flowers from some of these strips (still unsure of what I was doing at this point, but hey, it all looked pretty in the end).
- I placed the miniature leaves and flowers on one of the strips and used some whisked egg to secure them (I didn't photograph these steps as I secured them after playing around with the shapes right at the very end).
- I then punched out some five petal flowers using a metal cutter (top right photo) and used a tiny metal cutter to punch out the centre of each flower (bottom left photo).
- I used the tip of a metal barbecue skewer to create some lines on the edges of the petals of each flower to add some detail.
- I then proceeded to use the remaining pastry I rolled out to cover the top of my pie and trimmed the excess away (top left and right photo).
- I added my floral strip and flowers on top. I used a fork to press the edges down (sorry forgot to photograph this).
- I then decided to roll small balls to place in the centre of each flower - I thought they looked flat without the centre buds, this brought them to life.
- I rolled some of the scraps into long strips and added them to the top of my pie to look like shoots/stems.
- I added extra small balls of varying sizes to the shoots too.
- I then brushed the entire thing with egg wash, this gives your baked pie a beautiful golden colour, so make sure you don't skip this. Careful when brushing your shapes, they need to be secured with egg wash too otherwise they will move or come off when brushing the top.
- Bake your pie in the oven for 30 - 40 minutes at gas mark 5 until the top of the pie is golden brown.
- Serve your Quorn Pie with your favourite sides, ours tends to be chips, one veggie and lots of hot gravy!
- Enjoy.
Recipe by www.afeliaskitchen.com at https://www.afeliaskitchen.com/quorn-pie/