Afelia's Ultimate Roast Chicken
Prep time
Cook time
Total time
Author: Afelia's Kitchen
Serves: 6 - 8
Ingredients
For the stuffing:
For the stuffing:
- 15g butter (equivalent to 1 tbsp)
- 15g butter (equivalent to 1 tbsp)
- 2 medium onions
- 2 medium onions
- 7 cloves of garlic
- 7 cloves of garlic
- salt (to your preference)
- salt (to your preference)
- generous handful of coriander
- generous handful of coriander
- 1 cup of fresh breadcrumbs (this is made using 1 thick slice of bread)
- 1 cup of fresh breadcrumbs (this is made using 1 thick slice of bread)
- 1 medium egg
- 1 medium egg
For the roast:
For the roast:
- 1 large chicken (my chicken weighed 2.2kg, if you are using a smaller chicken adjust the quantities, see notes above)
- 1 large chicken (my chicken weighed 2.2kg, if you are using a smaller chicken adjust the quantities, see notes above)
- 80g butter
- 80g butter
- 4 oxo cubes
- 4 oxo cubes
- 1.5 tsp dried thyme
- 1.5 tsp dried thyme
- (optional) extra sprigs of thyme to garnish roast with
- (optional) extra sprigs of thyme to garnish roast with
(Optional) For roast vegetables:
(Optional) For roast vegetables:
- 3 - 4 carrots
- 3 - 4 carrots
- 3 large parsnips
- 3 large parsnips
- salt
- salt
- pepper
- pepper
- oil for drizzling
- oil for drizzling
For the gravy:
For the gravy:
- 2 tbsp cornflour
- 2 tbsp cornflour
- water as needed
Method
- The recipe calls for 1 cup of fresh breadcrumbs, start by preparing this if you haven't already.
- Take one slice of thick bread and tear by hand, place in a food processor and blitz until fine. Measure 1 cup of breadcrumbs, you may not need all of it.
- The chicken needs to be cleaned properly before washing and stuffing.
- Carefully remove any feathers from the skin using a pair of tweezers, trim off the excess neck skin.
- You can ask your butcher to prepare the chicken for you but I often find there are things I prefer to do myself as extra.
- Trim the chicken legs if they are too long and clean the inside of the chicken. I like to remove the top part of the wing as shown in the bottom left photo using a pair of scissors.
- Next wash the chicken thoroughly, inside and out. Leave upright to drain in a colander while you prepare the stuffing.
- Peel and roughly chop 2 medium onions.
- Peel and cut in half 7 cloves of garlic.
- Add 15g of butter (1 tbsp) to a pan.
- Once melted add the chopped onions and garlic cloves, saute for 7 - 10 minutes until brown and soft.
- Season the stuffing with salt, be generous if you are using rock salt like me. Alternatively use cooking salt (to your preference), remember this will be used to stuff the inside of your chicken so it needs to be seasoned well. The stuffing won't cook much more once inside the chicken, so make sure the onions/garlic are cooked properly at this stage.
- Whilst the stuffing sautes, wash and finely chop a generous handful of coriander.
- Once the stuffing is cooked, transfer to a mixing bowl and allow to cool.
- Next prepare the butter paste for marinating the chicken.
- Add 80g of butter to a bowl, soften using a wooden spoon.
- Add 4 crumbled Oxo stock cubes to the butter, the cubes are best crumbled in the packaging before opening....
- combine with the butter, use a spatula if this helps.
- Add 1.5 tsp of dried thyme, mix well and leave to one side.
- To the cooled stuffing mixture add the chopped coriander, 1 cup of breadcrumbs and crack in 1 egg.
- Mix and leave to one side.
- Before covering the chicken in the butter paste, ensure the surface of the skin is as dry as possible.
- Take a clean kitchen towel and using a dabbing motion remove as much moisture as possible, this will allow the butter to adhere to the skin properly.
- Do this for the top and bottom of the chicken.
- Once the chicken skin is dry, commence stuffing the cavity of the chicken. You will need a large bamboo skewer and string for this next part.
- Pack as much of the stuffing into the chicken as you possibly can, don't worry if you can't fit it all in, this can be added to the roasting pan and will add flavour to the roasted vegetables (if you plan on using them).
- Next use a bamboo skewer to 'stitch' together the skin.
- Pulling the skin taught towards you, insert the skewer at the bottom of end of the cavity opening.
- Take the sharp end and bring it over to the side you initially pierced the skin with (this will be the right side if you are right handed and left side if you are left handed), and insert the skewer just above where you did initially.
- Push the skewer all the way through to the other side and repeat this process till the cavity is sealed completely.
- Trim off the excess skewer.
- Cut a long piece of string and tie securely around one leg.
- Bring the other leg over and tie above, securing with a knot.
- Take both ends of the string....
- and bring them under the leg and tie securely again. Cut the excess string off.
- It's a good idea to preheat the oven at this point. Turn on the oven between gas mark 5 - 6 and carry on with the next few steps.
- Place the chicken into a large roasting pan and proceed to coat with the butter paste made earlier.
- Start coating the UNDERSIDE of the chicken first as the chicken will be roasted TOPSIDE up in the oven. Use half of the butter paste and don't worry if the skin isn't completely covered in every single spot, once in the oven, the skin will be basted with the butter marinade.
- Holding the neck of the chicken, carefully turn over the chicken and place upright.
- Cover the top side of the chicken in the butter paste too. The chicken is now ready to be roasted in the oven if you are planning to just roast the chicken WITHOUT vegetables, proceed to the step showing how to cover the chicken tray in foil.
- If you want to add roasted vegetables, peel and roughly chop 3 - 4 carrots and 3 large parsnips as shown in the bottom right photo....
- add the vegetables around the chicken.
- Drizzle the vegetables with oil and season generously with salt and pepper.
- Cover the chicken tray with foil and place in the centre of your oven. Cook at gas mark 6, COVERED for 1 hour and UNCOVERED for another 30 - 40 minutes (total cooking time 1 hour, 30 - 40 minutes). This time may need to be adjusted for smaller chickens.
- After 30 minutes it is a good idea to rotate the chicken tray (keeping it covered still) to ensure the chicken cooks evenly from all sides.
- After 1 hour remove all the foil covering the tray. Baste the chicken using a baster if you have one, or use a spoon and pour the juices from the tray over the chicken (bottom left and right photos). This will help flavour the chicken and prevent it from drying out as it cooks further.
- Use a spoon to turn and rotate the vegetables.
- Return the tray to the oven for another 30 - 40 minutes. In between this time you may want to remove the tray at 15 - 20 minute intervals to baste the chicken again.
- The chicken skin will crisp up and brown very nicely as it cooks but it is important to make sure the inside of the chicken is completely cooked too.
- After the allocated time check to see whether the chicken has cooked through completely using a metal skewer, insert it into the deepest part of the chicken and if the juices run clear the chicken is cooked. The tip of the skewer should be hot to the touch too. If the juices DO NOT run clear return the tray to the oven and cook for further 15 - 20 minutes or longer if necessary.
- Alternatively use a thermometer if you have one to read the internal temperature of the chicken (this should read 75 degrees Celsius or 165 degrees Fahrenheit).
- Be sure to allow the chicken to rest for 10 - 15 minutes before serving, this will ensure the meat is tender and moist.
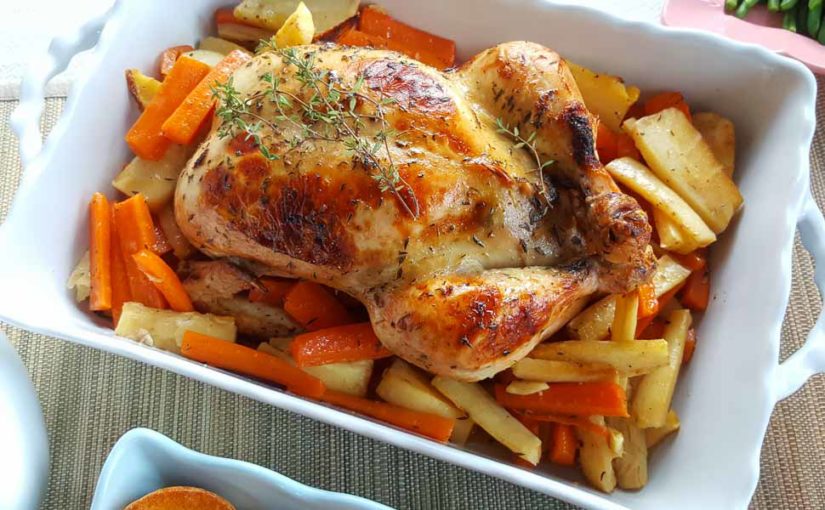
- Once the chicken is completely cooked transfer to a large serving dish, don't forget to remove the string. I left the skewer in place until it was time to serve as I didn't want to ruin the outer appearance.
- Use the juices in the tray to make gravy. In a small saucepan add 2 tbsp of cornflour....
- mix with enough cold water until the cornflour is completely dissolved.
- Pour in the juices from the tray and slowly bring to a boil to thicken, season with salt and pepper if necessary. Reserve in a gravy boat till it's time to serve the chicken.
- As a finishing touch add several sprigs of fresh thyme to the top of your roast chicken.
- Why not serve Afelia's Ultimate Roast Chicken with a potato gratin, instead of the usual roast potatoes? Plate up the roast with Yorkshire puddings and green beans and you're set for a delicious meal all the family will gather around the table for!
Recipe by www.afeliaskitchen.com at https://www.afeliaskitchen.com/afelias-ultimate-roast-chicken/