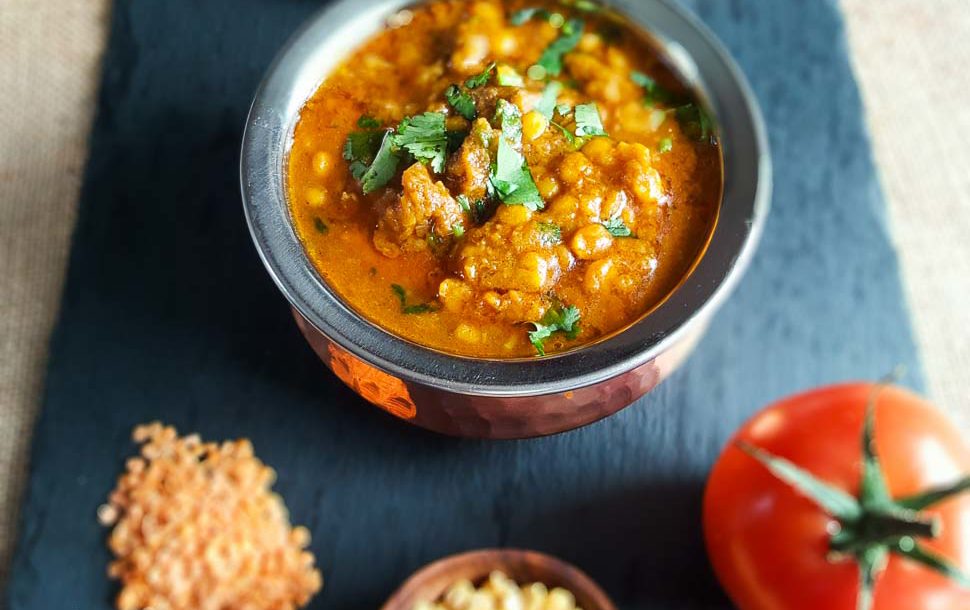
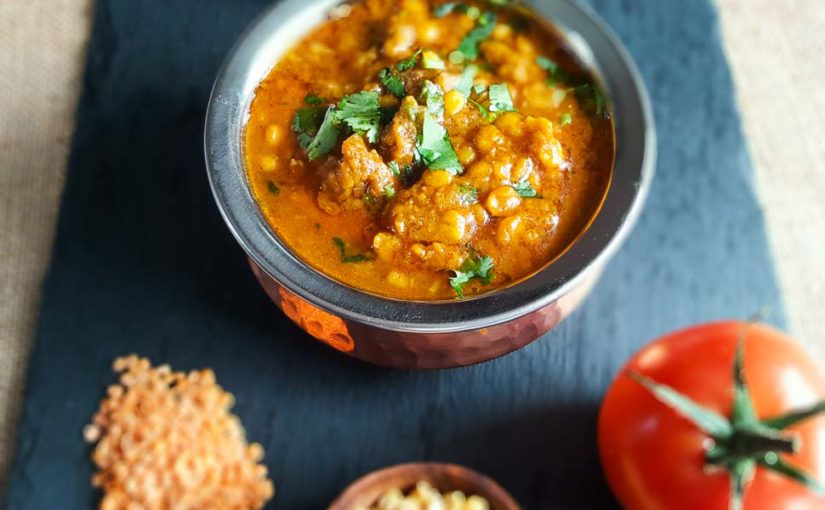
Dhansak is a sweet, spicy and sour dish that has its origins in Persian (Parsi) and Gujarati cuisine. The word ‘dhan’, translates as ‘seed’ or ‘grain’ from the Persian language, and ‘sak’ (also spelt ‘shaak’) comes from the Gujarati language to mean ‘stew’. An authentic Dhansak is prepared using either goat meat or mutton, along with a selection of lentils and vegetables. Traditionally these vegetables are pumpkin (or a squash of some sort), brinjal (aubergine), tomatoes and sometimes potato. The sourness of the dish comes from either tamarind, lemon or limes and as this dish is traditionally quite hot, the sourness and sweetness (from the vegetables) help to balance it all. This Lamb Dhansak is my take on a traditonal Dhansak, so it’s cooked in the way my family enjoy it – it may not be as authentic as the original Parsi version if that’s what you’re after, but it is delicious!
Traditionally a combination of lentils are used for dhansak, namely chana dal (split Bengal gram), urad dal (split black gram lentil), masoor dal (split red lentil) and toor dal (split pigeon pea). The type of lentils you choose to use are entirely up to you, you may use a mixture of these lentils or just one variety. I’ve chosen to use chana dal and masoor dal; I’ve used more chana dal as I like my dhansak to have some texture to it, I think this looks much more appetising than when it looks like mush (sorry to all you mushy dhansak fans out there!). Should you wish to achieve a more creamy/smooth consistency, use more masoor/urad/toor dal and less chana dal, or just boil the lentils and mash them down.
I am utilising my pressure cooker for this recipe, as otherwise the meat takes a lot longer to cook. If you don’t own a pressure cooker you can still follow the recipe, just make sure you tenderise the meat before adding the lentils. I have cooked this dish both by cooking the meat and lentils separately and then combining the two AND also by adding the soaked lentils to the tenderised meat and cooking them along with the meat; I must say I much prefer the first method (cooking separately and combining) as it speeds up the cooking process and tends to stick to the bottom of the pan a lot less this way.
You may use either lamb or mutton for this recipe, both work well. If you’re not a fan of strong tasting meat, opt for lamb as it won’t have a strong gamey taste like mutton does. Many of the spices that feature in an authentic dhansak appear in this recipe too – cumin, coriander, fenugreek and turmeric powder. If you’ve followed any of my other curry recipes, you’ll know that I LOOOVE using fenugreek seeds and dried fenugreek leaves in my cooking which is the reason why this recipe gets a double dose!
Lots of recipes will show you how to make a homemade dhansak masala, this usually contains many of the ingredients found in a garam masala, so in this recipe I am utilising my own homemade garam masala (recipe to follow shortly), which contains beautiful aromatic spices such as fennel, cardamom, cinnamon, cloves and star anise. Alternatively use a ready made dhansak/garam masala if you don’t have time to make your own.
I hope you all enjoy this delicious and comforting Lamb Dhansak recipe and it becomes a staple for the autumn and winter!
Serves 6 – 8
You will need: for Lamb Dhansak
1kg lamb or mutton cubed
1 cup of chana dal (split Bengal gram lentils)
1/4 cup of masoor dal (split red lentils)
3 medium onions
1 tomato
100ml oil
3 – 4 cinnamon sticks
3 – 4 bay leaves
3 – 4 cardamom pods
pinch of methi seeds (fenugreek seeds)
2 tsp minced ginger
2 tsp minced garlic
1 tbsp of dried methi leaves (fenugreek leaves)
2 tsp salt (adjust to your taste)
3 tsp Madras curry powder (I use the TRS brand)
1.5 tsp cumin powder
1 tsp coriander powder
1 tsp chilli powder
1 tsp mild Kashmiri chilli powder (optional, I use this to add colour to this dish, otherwise it can look very bland)
1 tsp turmeric powder
1 tsp garam masala
water as needed
coriander to garnish
Method:
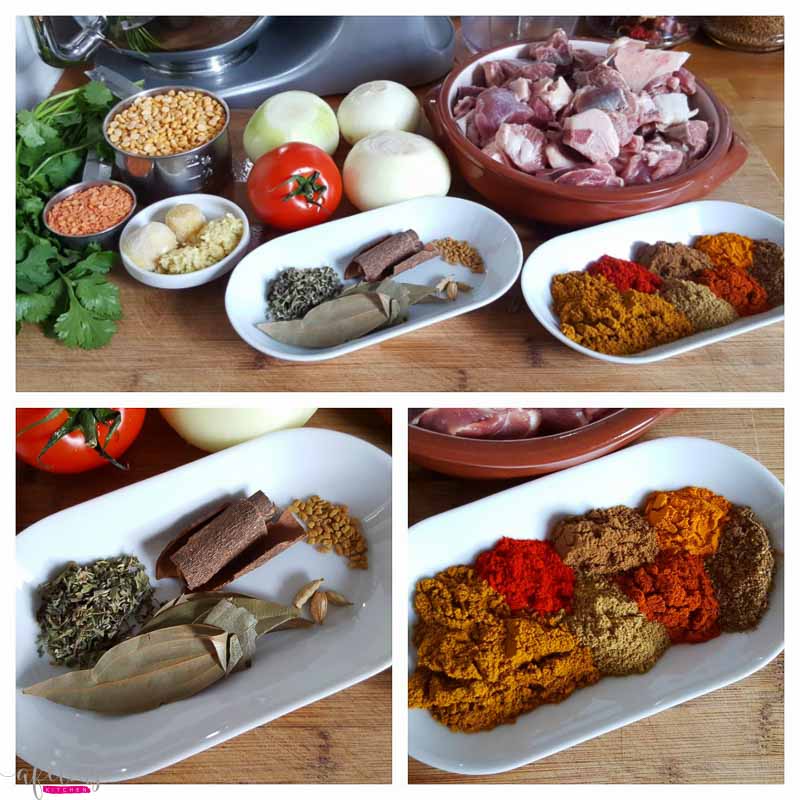
Whole spices in the bottom left photo, from left to right; 1 tbsp dried methi (fenugreek) leaves, 3 – 4 bay leaves, 3 – 4 cinnamon sticks, 3 cardamom pods and a pinch of methi seeds (fenugreek seeds).
Ground spices in the bottom right photo from left to right; 3 tsp Madras curry powder, 1 tsp Kashmiri chilli powder, 1.5 tsp cumin powder, 1 tsp coriander powder, 1 tsp chilli powder, 1 tsp turmeric powder and 1 tsp garam masala.
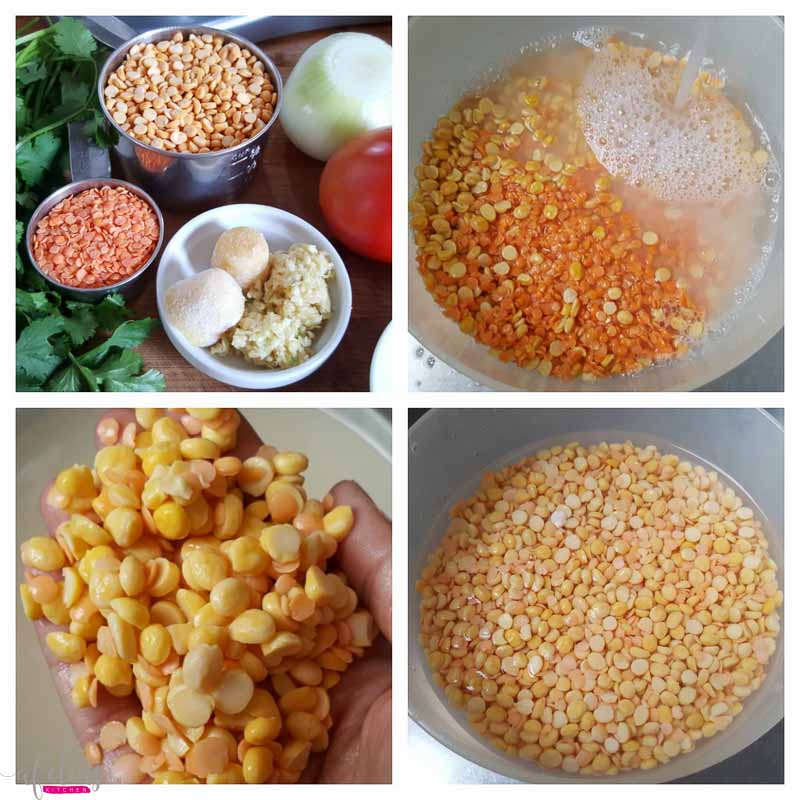
Start prepping for this recipe by measuring 1 cup of chana dal (split Bengal gram lentil) and 1/4 cup of masoor dal (red split lentils).
Soak the lentils for at least 2 hours with plenty of cold water, make sure the lentils are completely submersed with at least 2cm of water above the lentils themselves and allow to fully expand before commencing the recipe.
The photo on the bottom left shows you what the lentils should look like once they’re fully expanded.
The bottom right photo is of the lentils after being rinsed and washed till all the milky water has run clear and they are ready to use.
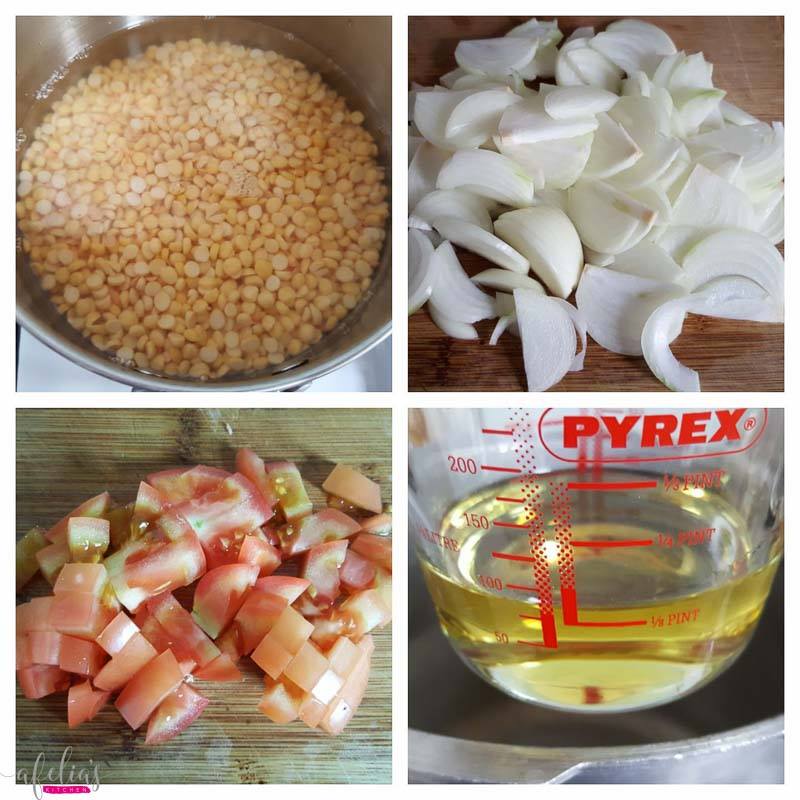
Place the washed lentils in a pot of cold water, bring to a boil and boil for 15 minutes. I set the timer to 15 minutes as I didn’t want completely mushy lentils and wanted some of the lentils to retain their shape, if you want more of a mushy consistency to your dhansak, boil for 25 – 30 minutes.
Next, peel and finely slice 3 onions and dice 1 tomato.
Measure 100ml of oil….
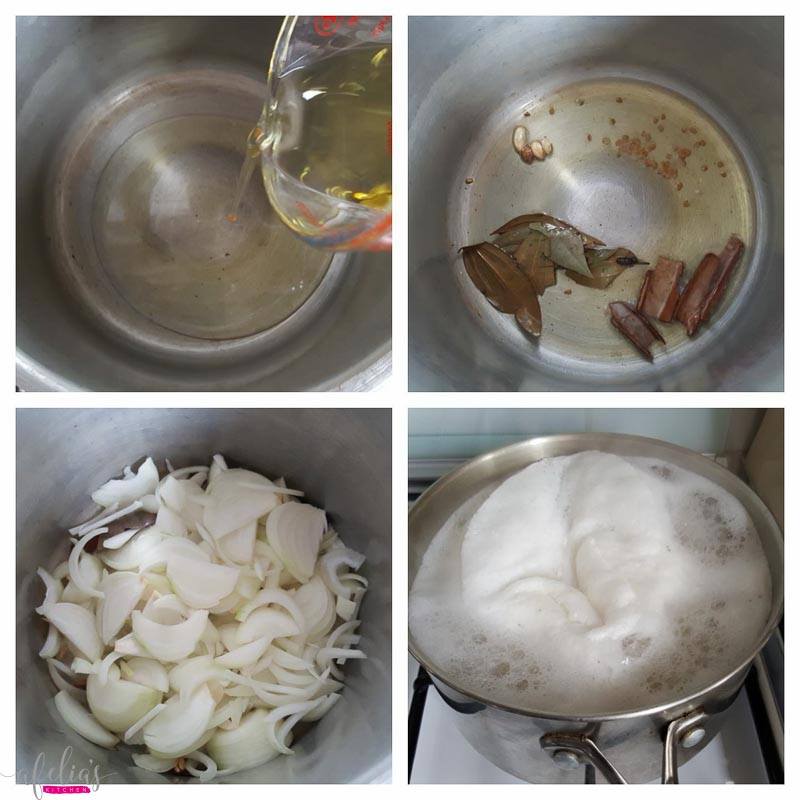
….and heat in your pressure cooker if you are using one, or a normal saucepan if you don’t own a pressure cooker.
Add the whole spices once the oil is hot – 3 – 4 cinnamon sticks, 3 – 4 bay leaves, 3 – 4 cardamom pods and a pinch of methi seeds (fenugreek seeds).
Allow the spices to fry until the aromas are released and then add the 3 sliced onions and fry till lightly browned, stir occasionally to ensure even browning.
By now the lentils will have reached boiling point, there will be foam on the top (you may skim this if you want to), lower the heat slightly so that this doesn’t overflow and boil over a medium high flame till the time is up.
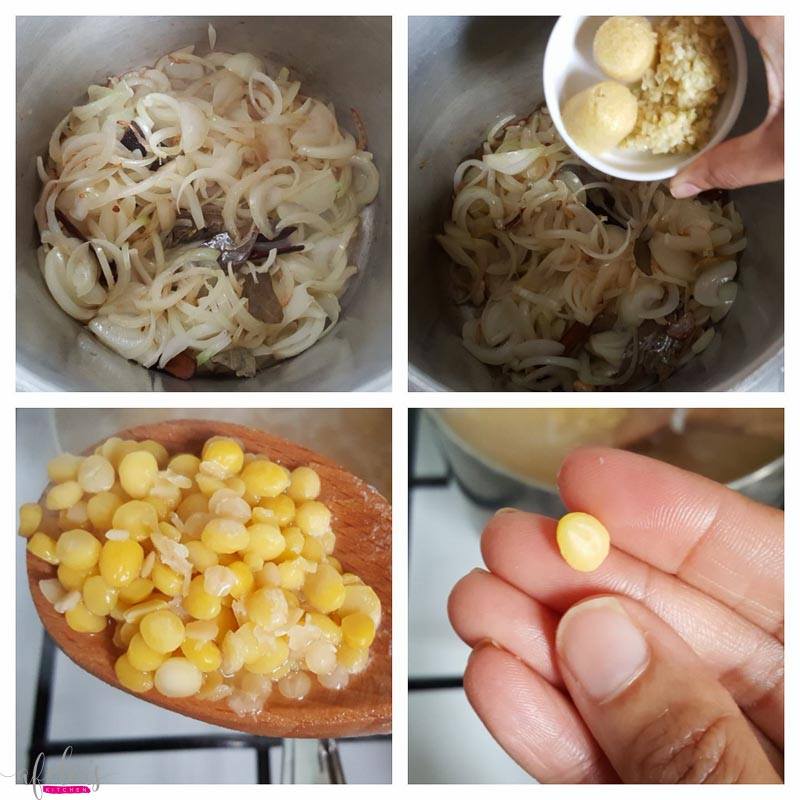
Once the onions are slightly brown all over, add 2 tsp minced ginger and 2 tsp minced garlic, mix and saute till the rawness has gone from the ginger and garlic.
After 15 minutes of boiling this is what my lentils looked like (bottom left photo). The masoor dal were mostly cooked but the chana dal were cooked on the outside but not completely on the inside which is what I wanted as they will cook further once added to the meat. I took one one chana dal and pressed between my fingers….
….it squashed easily which told me the chana was done. I turned off the heat at this point and kept the lentils to one side until needed.
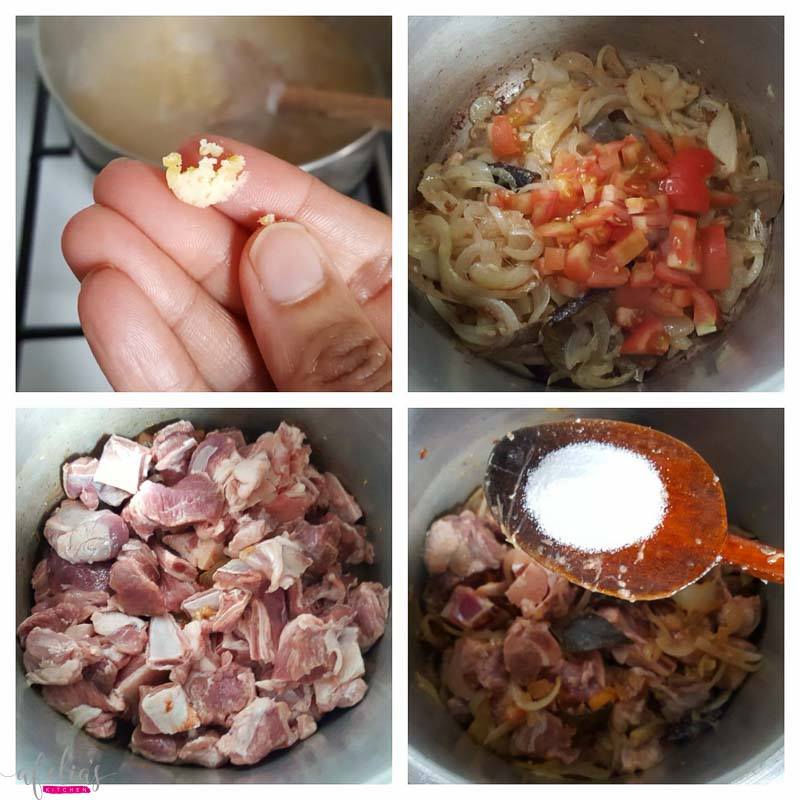
After frying the ginger and garlic add the diced tomato, followed by the meat, 2 tsp of salt….
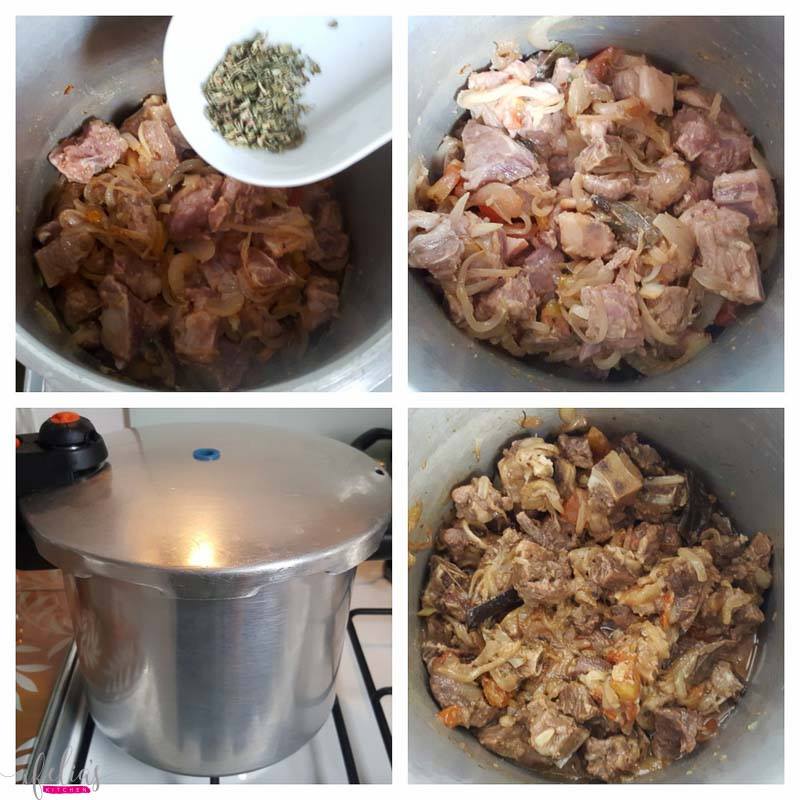
….and 1 tbsp of dried methi leaves (fenugreek leaves). Mix everything together thoroughly and pressure cook your meat for 30 minutes or until tender.
IMPORTANT – Please refer to your manufacturer’s instructions on how to use your pressure cooker, if in doubt add extra water to the meat at this stage as you don’t want the pressure cooker to run dry, this can be dangerous! I have used my pressure cook many times and have gauged how long I can cook my meat for before the pressure cooker runs dry.
If you are using a normal saucepan, cook the meat for about 1 hour till the meat is tender, add more water as is necessary to stop the meat from drying out and burning.
After pressure cooking the meat, it looked as it does in the bottom right photo; all the ingredients will have softened and be cooked through completely.
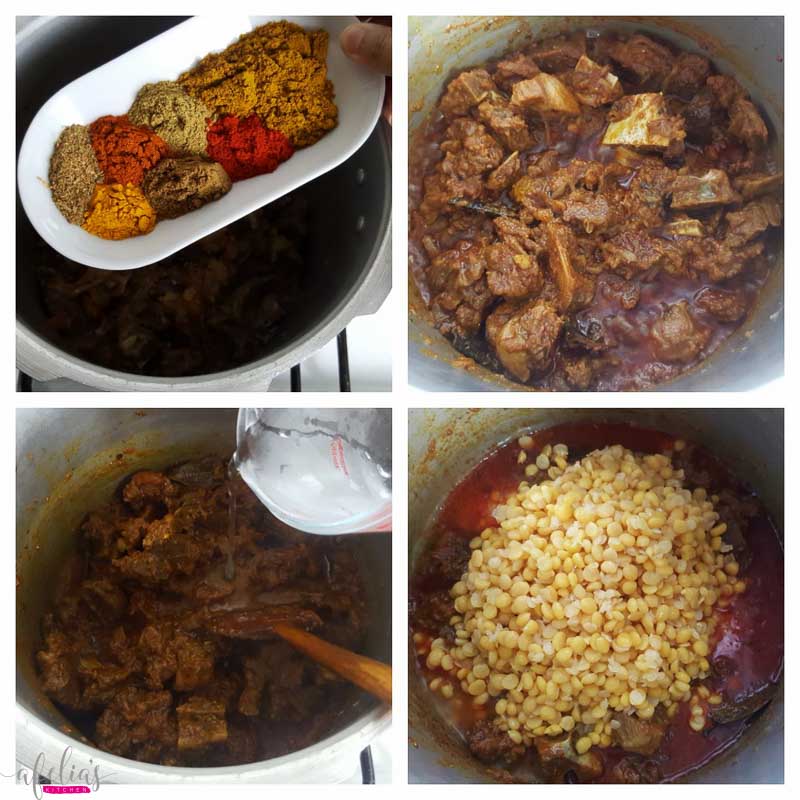
Add all the ground spices at this stage; 3 tsp Madras curry powder, 1.5 tsp cumin powder, 1 tsp coriander powder, 1 tsp chilli powder, 1 tsp mild Kashmiri chilli powder, 1 tsp turmeric powder and 1 tsp garam masala.
Mix all of the ingredients and allow the spices to fry for 8 – 10 minutes. The curry seemed quite dry at this point so I added some water to stop the spices from burning.
Next add the cooked lentils along with the water it has been cooking in….
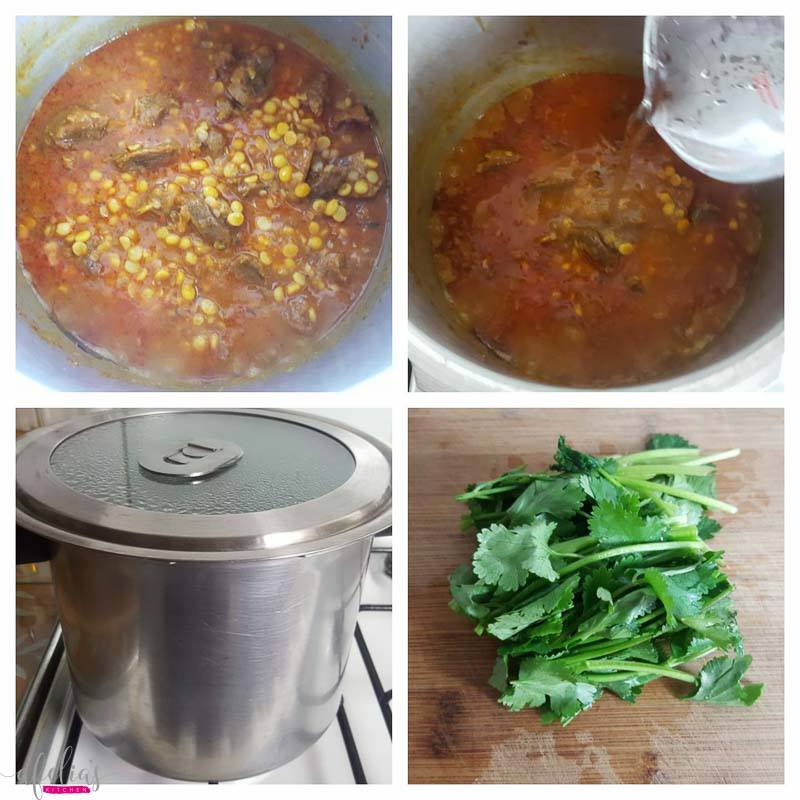
….mix the lentils with the meat and top up with more cold water, I used between 250ml – 300ml more water. If you want the consistency to be drier, use less, if you want it more soupy, add more water.
Bring the curry to a boil and boil for 10 – 15 minutes – note that I have used a standard saucepan lid instead of the pressure cooker lid as I didn’t want my lentils to completely disintegrate, you may choose to do so if you wish.
Whilst the curry boils chop some fresh coriander for garnishing later.
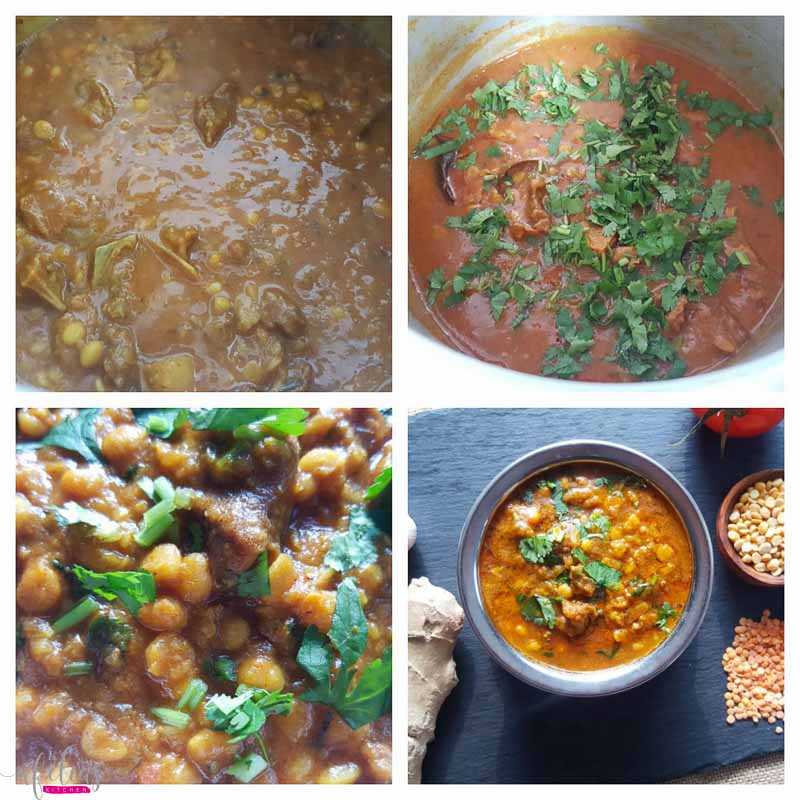
Once the curry has boiled it should be thick and mushy as in the top left photo. If you want it more mushy, simply add more water and boil some more, use a spoon to mix and break down the lentils further.
Garnish the dish with coriander after removing from the heat.
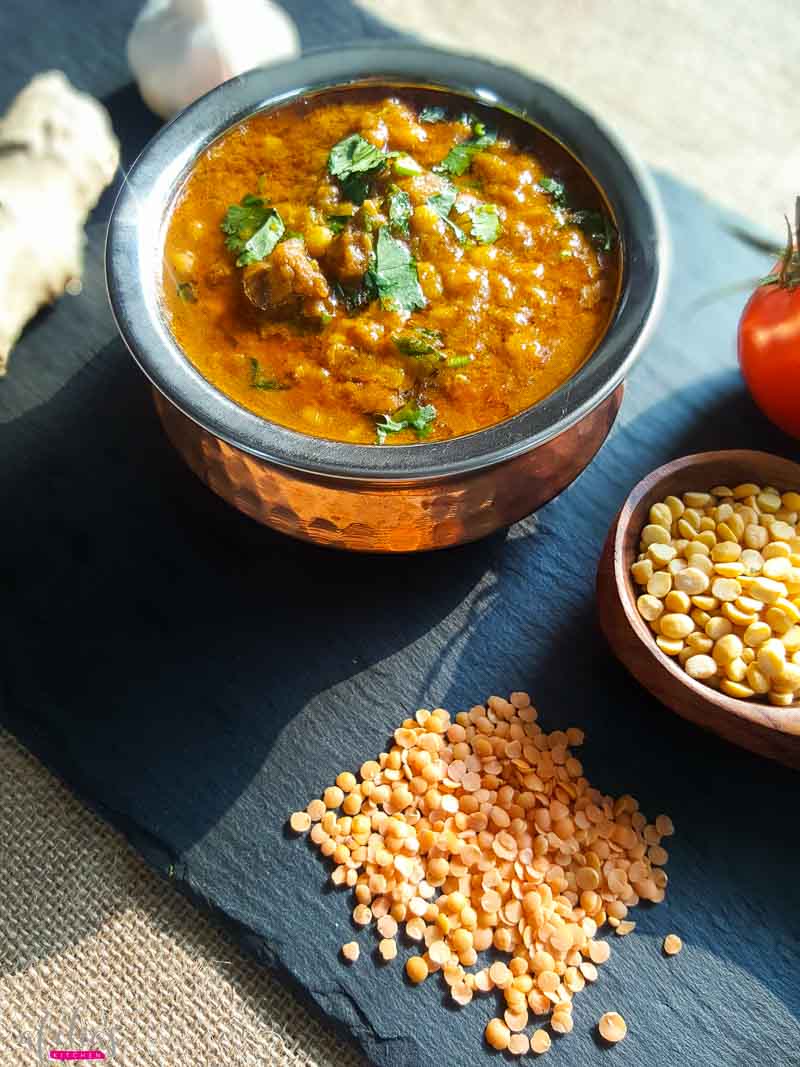
Serve the Lamb Dhansak with your favourite rice or flatbread and watch the faces around your dining table glow with pleasure.
TIP: If you want an glossy/oily finish to your Lamb Dhansak, add some ghee to the top of the curry just before serving, this not only makes it look good it tastes butterier too!
Bon Appetit!
- 1kg lamb or mutton cubed
- 1 cup of chana dal (split Bengal gram lentils)
- ¼ cup of masoor dal (split red lentils)
- 3 medium onions
- 1 tomato
- 100ml oil
- 3 - 4 cinnamon sticks
- 3 - 4 bay leaves
- 3 - 4 cardamom pods
- pinch of methi seeds (fenugreek seeds)
- 2 tsp minced ginger
- 2 tsp minced garlic
- 1 tbsp of dried methi leaves (fenugreek leaves)
- 2 tsp salt (adjust to your taste)
- 3 tsp Madras curry powder (I use the TRS brand)
- 1.5 tsp cumin powder
- 1 tsp coriander powder
- 1 tsp chilli powder
- 1 tsp mild Kashmiri chilli powder (optional, I use this to add colour to this dish, otherwise it can look very bland)
- 1 tsp turmeric powder
- 1 tsp garam masala
- water as needed
- coriander to garnish
- Whole spices in the bottom left photo, from left to right; 1 tbsp dried methi (fenugreek) leaves, 3 - 4 bay leaves, 3 - 4 cinnamon sticks, 3 cardamom pods and a pinch of methi seeds (fenugreek seeds).
- Ground spices in the bottom right photo from left to right; 3 tsp Madras curry powder, 1 tsp Kashmiri chilli powder, 1.5 tsp cumin powder, 1 tsp coriander powder, 1 tsp chilli powder, 1 tsp turmeric powder and 1 tsp garam masala.
- Start prepping for this recipe by measuring 1 cup of chana dal (split Bengal gram lentil) and ¼ cup of masoor dal (red split lentils).
- Soak the lentils for at least 2 hours with plenty of cold water, make sure the lentils are completely submersed with at least 2cm of water above the lentils themselves and allow to fully expand before commencing the recipe.
- The photo on the bottom left shows you what the lentils should look like once they're fully expanded.
- The bottom right photo is of the lentils after being rinsed and washed till all the milky water has run clear and they are ready to use.
- Place the washed lentils in a pot of cold water, bring to a boil and boil for 15 minutes. I set the timer to 15 minutes as I didn't want completely mushy lentils and wanted some of the lentils to retain their shape, if you want more of a mushy consistency to your dhansak, boil for 25 - 30 minutes.
- Next, peel and finely slice 3 onions and dice 1 tomato.
- Measure 100ml of oil....
- and heat in your pressure cooker if you are using one, or a normal saucepan if you don't own a pressure cooker.
- Add the whole spices once the oil is hot - 3 - 4 cinnamon sticks, 3 - 4 bay leaves, 3 - 4 cardamom pods and a pinch of methi seeds (fenugreek seeds).
- Allow the spices to fry until the aromas are released and then add the 3 sliced onions and fry till lightly browned, stir occasionally to ensure even browning.
- By now the lentils will have reached boiling point, there will be foam on the top (you may skim this if you want to), lower the heat slightly so that this doesn't overflow and boil over a medium high flame till the time is up.
- Once the onions are slightly brown all over, add 2 tsp minced ginger and 2 tsp minced garlic, mix and saute till the rawness has gone from the ginger and garlic.
- After 15 minutes of boiling this is what my lentils looked like (bottom left photo). The masoor dal were mostly cooked but the chana dal were cooked on the outside but not completely on the inside which is what I wanted as they will cook further once added to the meat. I took one one chana dal and pressed between my fingers....
- it squashed easily which told me the chana was done. I turned off the heat at this point and kept the lentils to one side until needed.
- After frying the ginger and garlic add the diced tomato, followed by the meat, 2 tsp of salt....
- and 1 tbsp of dried methi leaves (fenugreek leaves). Mix everything together thoroughly and pressure cook your meat for 30 minutes or until tender.
- IMPORTANT - Please refer to your manufacturer's instructions on how to use your pressure cooker, if in doubt add extra water to the meat at this stage as you don't want the pressure cooker to run dry, this can be dangerous! I have used my pressure cook many times and have gauged how long I can cook my meat for before the pressure cooker runs dry.
- If you are using a normal saucepan, cook the meat for about 1 hour till the meat is tender, add more water as is necessary to stop the meat from drying out and burning.
- After pressure cooking the meat, it looked as it does in the bottom right photo; all the ingredients will have softened and be cooked through completely.
- Add all the ground spices at this stage; 3 tsp Madras curry powder, 1.5 tsp cumin powder, 1 tsp coriander powder, 1 tsp chilli powder, 1 tsp mild Kashmiri chilli powder, 1 tsp turmeric powder and 1 tsp garam masala.
- Mix all of the ingredients and allow the spices to fry for 8 - 10 minutes. The curry seemed quite dry at this point so I added some water to stop the spices from burning.
- Next add the cooked lentils along with the water it has been cooking in....
- mix the lentils with the meat and top up with more cold water, I used between 250ml - 300ml more water. If you want the consistency to be drier, use less, if you want it more soupy, add more water.
- Bring the curry to a boil and boil for 10 - 15 minutes - note that I have used a standard saucepan lid instead of the pressure cooker lid as I didn't want my lentils to completely disintegrate, you may choose to do so if you wish.
- Whilst the curry boils chop some fresh coriander for garnishing later.
- Once the curry has boiled it should be thick and mushy as in the top left photo. If you want it more mushy, simply add more water and boil some more, use a spoon to mix and break down the lentils further.
- Garnish the dish with coriander after removing from the heat.
- Serve the Lamb Dhansak with your favourite rice or flatbread and watch the faces around your dining table glow with pleasure.
- TIP: If you want an glossy/oily finish to your Lamb Dhansak, add some ghee to the top of the curry just before serving, this not only makes it look good it tastes butterier too!
If you like the recipe please share with friends and family, also follow me on Facebook and Instagram. Questions? Leave a comment below or message me on Facebook.

Jon Lang
Hi, thankyou very much. I went with your recipe, but added a few carrots and potatoes to stretch 1/2 kilo of lamb.
The Kashmir chilli I managed to get from my local shop was hot hot hot.
At the end it was way too hot for me and I added Tamarind and honey to sour and sweeten.
This resulted in a delicious Dhansak, and I might do it again, only without hot chilli powder.
I had to have about a glass full of yoghurt withit though.
afelia’s kitchen
Hi, sorry to hear the curry ended up being too spicy for you but I’m happy you managed to fix this. I hope you can tweak the recipe to your liking next time! 🙂
Jen
So delicious, thank you very much for the detailed instructions.
afelia’s kitchen
You’re most welcome, I’m really pleased you enjoyed the dish. 🙂
Rajiv
Hello – Apologies for my ignorance – have tried checking out your entire recipe – still couldn’t figure out – What are the 2 round ball like things in your minced ginger/garlic plate?
afelia’s kitchen
Hi that’s just frozen ginger and garlic, the mould is shaped round instead of cubed so that’s why they’re round in shape. Two round balls are ginger and the other two are garlic, hope this helps. 🙂
Sobia Iqbal
Hi I was wondering what the process is for cooking the meat and lentils together rather than separately? I’d prefer it just because I like the taste of the meat to be absorbed by the lentils. Thank you
Wade Whitehouse
So glad I tried this. Looks and tastes amazing. Great recipe and easy to follow method. 👍
afelia’s kitchen
Thanks for the feedback, glad you enjoyed it! 🙂
The Covered Accountant
This came out perfect! From someone who can’t cook! I loved how it tasted and I’m sure it’ll please everyone tomorrow for Eid!
afelia’s kitchen
Awesome, I hope you have a fantastic day!! 🙂 xx
Ali Habib
Great recipe. Made it a few times and I have to say with Scottish Spring Lamb, the curry is to die for.
sadi
OH MY ALLAH! sis I just made it and it looks sooo good! can’t wait to eat it! Affa thank you so much for these recipes, really easy to follow. Meant I could prep it all before the little one has his nap. finished just in time!
Amerin
I made this recipe today and I must say everyone loved it. The dish tasted really nice and the lamb was so soft and just melted in your mouth. I love trying your recipes out as it is easy to follow and never fails to disappoint. Thank you for posting great recipes!
afelia’s kitchen
You’re welcome, happy you find the recipes easy to follow! xx
Katijha
I made Afelia’s Lamb Dhansak today, it looks n smells amazing, it’s a bit of a process but worth it as my hubby said it was so tasty, perfect for my family as my son n my Husand eat meat and I am vegetarian but I can eat this as I would pick out the meat for me, defo will be repeating x
Shahima Begum
Great recipe, easy to follow and curry tasted delicious! My only feedback is maybe to have each photo followed by the instruction for the recipe. However I followed it fine. Thank you!
Nadia Yasmin
Salaam, hey, I would like to try this recipe however I don’t like using whole spices in my cooking as it makes it too aromatic. Would it make a huge different to the taste if I omit the whole spices and the fenugreek leaves?
afelia’s kitchen
Wa alaikum as salaam……these whole spices are not strong at all in the way you are thinking, whole spices such as cloves, black pepper and star anise etc. are really strong, this recipe does not have any overpowering aromas/tastes, please try the recipe as it is, I’m certain you won’t be disappointed. And yes, it would affect the finished dish making it less tasty, if the spices you mentioned are left out. x
Shakeela
Have been wanting to make this combination for a while but wasn’t sure how to go about it to ensure even cooking of both the lentils and meat! Easy to follow instructions and smells delicious- once again thank you!