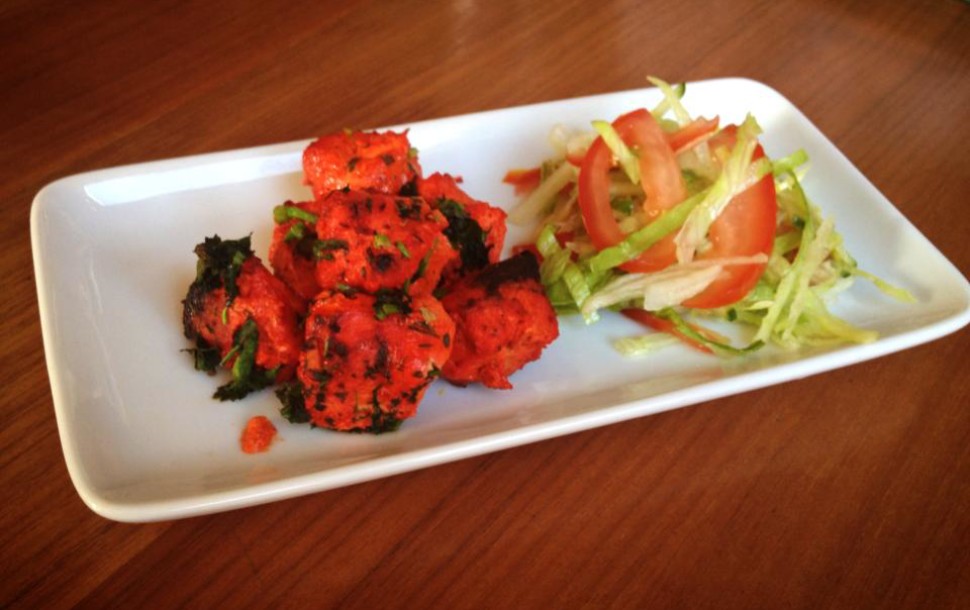
A recipe that will keep your chicken breasts moist, tastes delicious served with salad as a starter or as a main meal.
Tandoori chicken has to be without a doubt one of the most loved Indian dishes. It is popular in the Indian subcontinent and famous the world over. Every household has their own technique and this is just one of the many ways I cook this dish. Chicken Tikka is essentially tandoori chicken, the principle difference being the cut of meat; Chicken Tikka uses smaller boneless chicken pieces, whereas tandoori chicken comes on the bone. Traditionally Chicken Tikka is cooked in a tandoor oven but since not all of us own clay ovens, we shall try to imitate the cooking results of a tandoor oven using a grill and skewers. My children love to eat this as a starter to their main meal and sometimes I make a main meal out of it too by adding salad, yoghurt/mayonnaise, sweet chilli sauce and serving in a wrap or pitta bread.
I don’t often use chicken breasts to cook curries, so when I buy whole chickens I tend to separate the breasts from the boned parts of the chicken ie. thigh, drumsticks, wings etc. This way I can use the breasts for dishes like this or for Chicken Pakoras, chicken coronation or chicken pie; recipes which call for more substantial meaty cuts of chicken. When I prepare the breasts in this way I find it doesn’t go to waste and everything gets eaten. I’ve used natural yoghurt in this recipe but you can always opt for a Greek yoghurt if that’s what you have at home. You could always try to add other spices/flavours to this too if you wanted to experiment; try methi (fenugreek) leaves, lime juice instead of lemon, chilli pickle or even a pinch of garam masala. I love this recipe just the way it is and hope it becomes a staple in your household too.
You will need: for Chicken Tikka
Diced chicken breast (approx 600-800g, keep pieces fairly large)
1/2 pot of natural yoghurt
1 tsp minced ginger
1 tsp minced garlic
1 tbsp lemon juice
2 tbsp oil
1/2 tsp chilli powder
4 tsp dry tandoori powder (I use Rajah brand)
red and yellow/orange food colouring
additional salt if needed
Method:
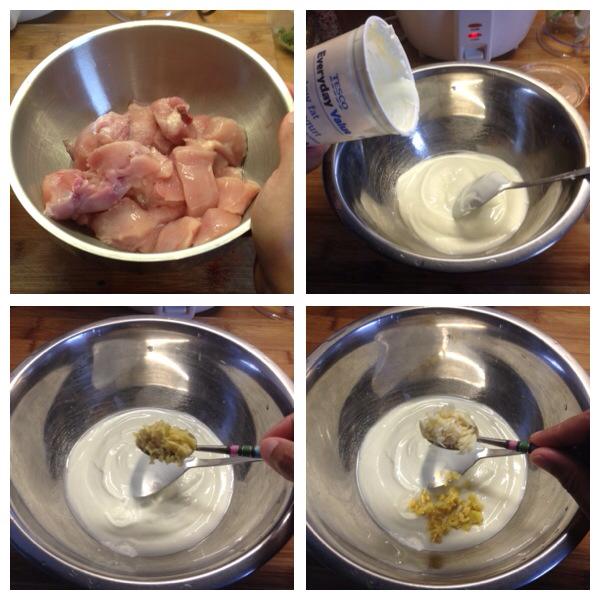
Wash and drain your chicken pieces. Add half a pot of yoghurt to a clean bowl, then add 1 tsp of crushed ginger and 1 tsp garlic.
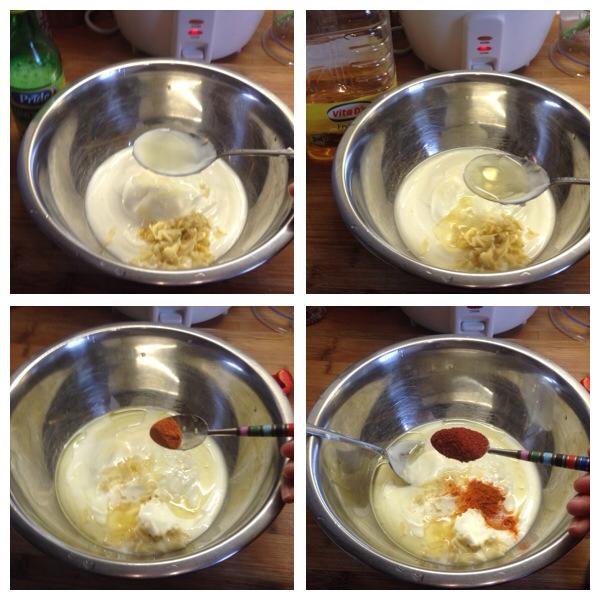
Add 1 large tbsp of lemon juice (the acidity helps to make the meat tender), 2 tbsp of oil, 1/2 tsp chilli powder and 4 tsp of tandoori powder. If you are using a paste, I would use the same amount ie. 4 tsp of tandoori paste.
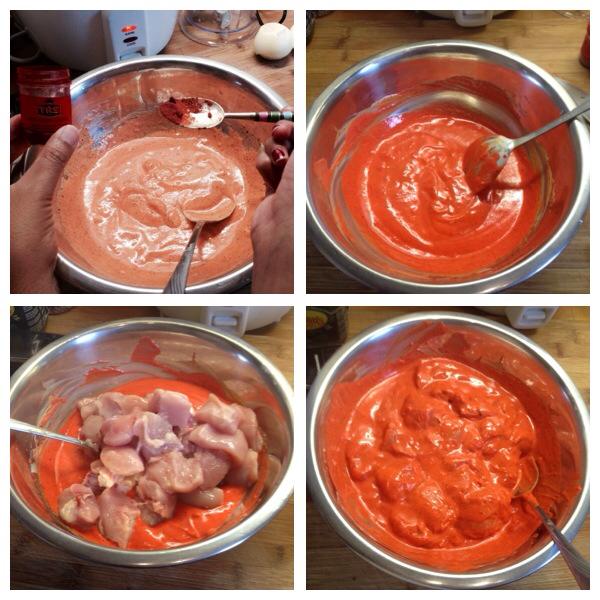
Add 1/4 tsp of red food colouring and a little yellow/orange colouring too, if you want a deep red colour you may use 1/2 tsp. Stir all the ingredients thoroughly. Taste your marinade and add extra salt if you feel you need it, I didn’t add any but it really depends on what powder/paste you’re using.
Add your diced chicken breasts, coat all the pieces thoroughly and leave to marinate for as long as possible, preferably overnight (this was what I did). The chicken will take on all the flavours the longer it’s been left to marinate.
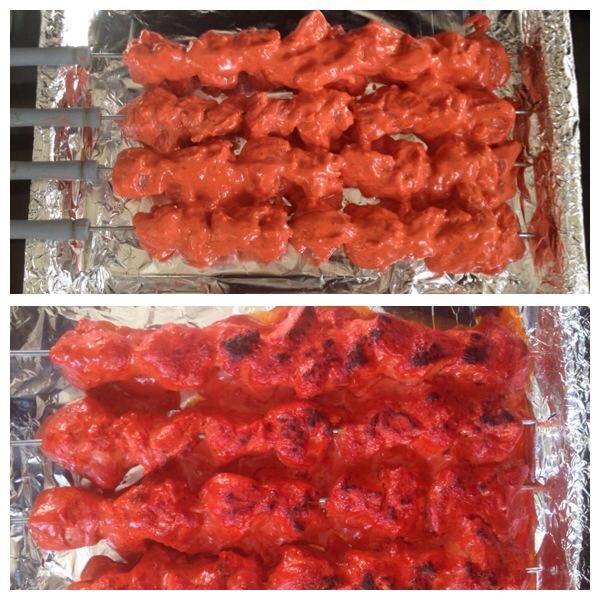
You can cook the chicken tikka in the oven, on the stove top (but this requires more oil and is best avoided if possible) or under the grill. I prefer grilling as I find it results it the look and smell of tandoori chicken cooked in a tandoor oven, it has that charred effect.
I’ve threaded the chicken breasts onto metal skewers and placed under my grill. Add any leftover marinade on top of the chicken skewers, this will just cook over the chicken, don’t throw it away! Let the chicken really brown, even ‘burn’ slightly in some places and then rotate and do the same to the underside.
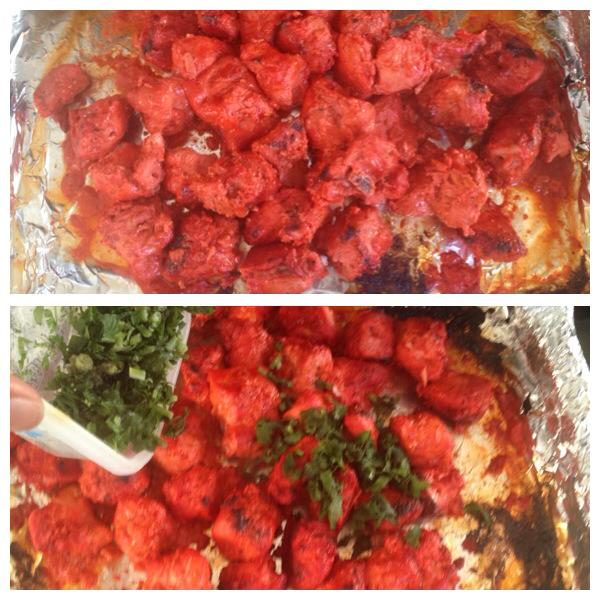
Once both sides were cooked, I removed the chicken from skewers and let it brown some more to allow parts that the grill didn’t reach to cook thoroughly. This process can take between 20 – 30 minutes depending on how low/high the grill flame is.
Lastly add some chopped coriander to garnish (optional). I’ve used frozen here; it’s fine as long as you return to the grill and cook it through immediately, otherwise stick to fresh coriander.
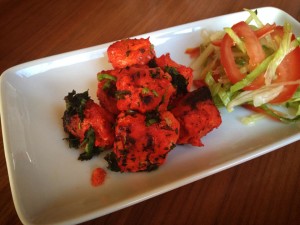
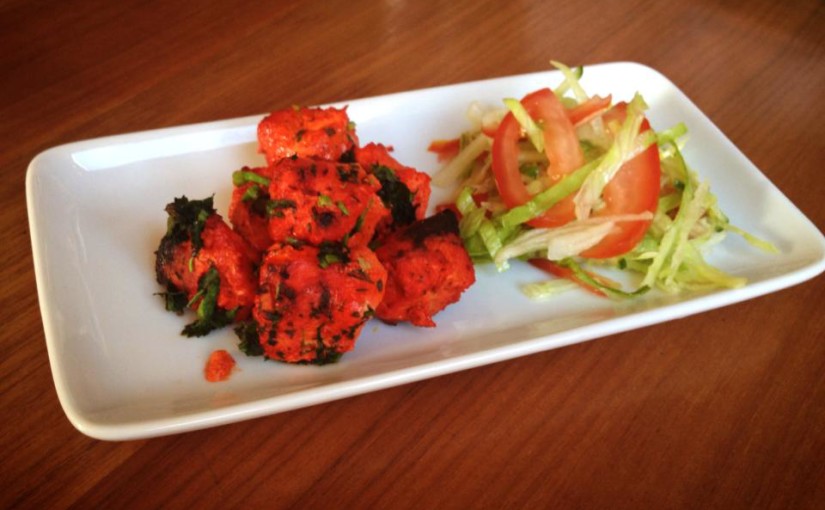
Enjoy your Chicken Tikka with salad or in pitta bread/tortilla wrap for a more substantial meal! Serve with a yoghurt mint sauce if you don’t like it dry.
Bon Appétit!
- Diced chicken breast (approx 600-800g, keep pieces fairly large)
- ½ pot of natural yoghurt
- 1 tsp minced ginger
- 1 tsp minced garlic
- 1 tbsp lemon juice
- 2 tbsp oil
- ½ tsp chilli powder
- 4 tsp dry tandoori powder (I use Rajah brand)
- red and yellow/orange food colouring
- additional salt if needed
- Wash and drain your chicken pieces. Add half a pot of yoghurt to a clean bowl, then add 1 tsp of crushed ginger and 1 tsp garlic.
- Add 1 large tbsp of lemon juice (the acidity helps to make the meat tender), 2 tbsp of oil, ½ tsp chilli powder and 4 tsp of tandoori powder. If you are using a paste, I would use the same amount ie. 4 tsp of tandoori paste.
- Add ¼ tsp of red food colouring and a little yellow/orange colouring too, if you want a deep red colour you may use ½ tsp. Stir all the ingredients thoroughly. Taste your marinade and add extra salt if you feel you need it, I didn't add any but it really depends on what powder/paste you're using.
- Add your diced chicken breasts, coat all the pieces thoroughly and leave to marinate for as long as possible, preferably overnight (this was what I did). The chicken will take on all the flavours the longer it's been left to marinate.
- You can cook the chicken tikka in the oven, on the stove top (but this requires more oil and is best avoided if possible) or under the grill. I prefer grilling as I find it results it the look and smell of tandoori chicken cooked in a tandoor oven, it has that charred effect.
- I've threaded the chicken breasts onto metal skewers and placed under my grill. Add any leftover marinade on top of the chicken skewers, this will just cook over the chicken, don't throw it away! Let the chicken really brown, even 'burn' slightly in some places and then rotate and do the same to the underside.
- Once both sides were cooked, I removed the chicken from skewers and let it brown some more to allow parts that the grill didn't reach to cook thoroughly. This process can take between 20 - 30 minutes depending on how low/high the grill flame is.
- Lastly add some chopped coriander to garnish (optional). I've used frozen here; it's fine as long as you return to the grill and cook it through immediately, otherwise stick to fresh coriander.
If you like the recipe please share with friends and family, also follow me on Facebook and Instagram. Questions? Leave a comment below or message me on Facebook.
aleena
Could this be made without the skewers?
afelia’s kitchen
Yes of course, just grill under the grill without skewering. x
Mark
You mention ‘flame’ on the grill, i was confused because most grills are electric and don’t produce flames, can you let me know what you mean….Thanks 🙂
afelia’s kitchen
Yes my grill is a gas grill, so when I say ‘flame’ I mean exactly that as my grill isn’t electric, I have a naked flame.
Mark
Thanks for the reply
So the best option for me then would be oven since i don’t have a gas grill. i will have to get out more because i have never seen a gas grill ??
afelia’s kitchen
I reckon pan frying would be the best option, an oven tends to dry out the chicken, unless you have a grill and oven function that work together? I would suggest cooking in a pan brushed with oil at a high heat so the chicken gets seared and charred on the outside first, then cook on a lower heat for a few more minutes to cook it through fully.
Samiya
Amazing!!!! already made it twice and both times turned out great. Thank you.
Jayne Waterworth
Hello I wonder if you can help me, could you please give me the recipe for the pink side sauce you have with a chicken tikka starter, I have looked everywhere but unable to find it. Thank you.
afelia’s kitchen
I’m not sure I know which pink sauce you’re talking about, is this in the UK?
Aysha
Great recipe and step by step guide. Follow to a T and you wont go wrong.
afelia’s kitchen
I’m so pleased you like it! 🙂
Sumz
Would you have a recipe for the pitas?
afelia’s kitchen
Sorry no. x
Huda
Salam sis, can we omit the food colouring? How would it look without it? Would it affect the taste either? And freezing suggestions? JazakAllah xxx
afelia’s kitchen
WS…..you may omit the food colouring and no it won’t affect the taste but it won’t be as nice in colour. x
sana
Hi if I want to make this in the oven at what temperature should it be and how long does it take to be cooked? 🙂
afelia’s kitchen
I don’t normally cook this in the oven but at gas mark 6 for about 30 – 35 mins ought to do it. 🙂
TAHIRA
I MADE IT IN OVEN WAS VERY GOOD
Fathima Khatun
Can i make this in the oven instead of grill?
afelia’s kitchen
You can do, but I imagine it may dry out more than it’s supposed to in the oven. x
Nicola
Hello how much yogurt do you need as it says half a pot but what size pot. Thank you
afelia’s kitchen
A standard yoghurt pot size is 450g, so use half that size, hope this answers your question. 🙂
Salina
Made this again today- so yummy!
afelia’s kitchen
YAY! xx
Salina
Even though I go Uni now, I am still the baby in the family since I’m the youngest. The only thing I could make properly is probably tea. I really wanted to make something nice the other day and I followed your step by step recipe. I was so amazed that the chicken tikka came out how it should. It tasted so good! Couldn’t believe that I made it. Thank you so much for these easy to follow recipes.
afelia’s kitchen
Aww, you’re welcome Salina, I’m so glad you enjoyed the Chicken Tikka. I hope you enjoy experimenting in the kitchen following some of my other recipes! 🙂 x
Sal
How many people would this serve?
afelia’s kitchen
As a starter 4 – 5 people. xx